
Sep 24, 2026
Operation and Maintenance for Stormwater Filters
Sustainability Strategy
In This Article
Inspect, measure, and act: a fixed O&M cycle to prevent clogging, bypass, and filter failure.
Operation and Maintenance for Stormwater Filters
If a stormwater filter ponds for more than 72 hours, bypasses flow, or shows sediment buildup of 1 inch to 3 inches in key areas, I treat that as a maintenance trigger - not a wait-and-see issue. The article’s core message is simple: I keep filters working by following a fixed cycle of prepare, inspect, clean, repair, verify, and record.
If I had to boil the whole article down, it would be this:
I inspect on a set schedule based on the permit, site history, and storm events.
I check the highest-risk parts first: pretreatment zones, inlets, media surface, underdrains, outlets, and bypass features.
I remove sediment before capacity drops, using field measurements instead of guesses.
I choose the lightest fix that works - surface cleaning, partial media replacement, or full replacement.
I move to repairs when cleaning no longer fixes drawdown.
I verify every repair and log every visit with photos, rainfall, measurements, and follow-up dates.
I treat vaults and chambers as confined spaces unless a qualified person says otherwise.
A few numbers in the article matter right away:
Ponding longer than 72 hours is a warning sign.
Some guidance uses 1 inch of sediment on filter beds as a cleanout trigger.
Pretreatment cleanout may be triggered at 18 inches or half the chamber depth to the outlet, whichever is less.
Sediment around 3 inches on a filter bed can also signal clogging, depending on the guidance used for the site.
What matters most is not the calendar alone. Measured sediment depth, drawdown time, bypass, and repeat trouble after storms tell me when the filter needs work. Good maintenance records then help me tighten the inspection plan and stop the same problems from coming back.
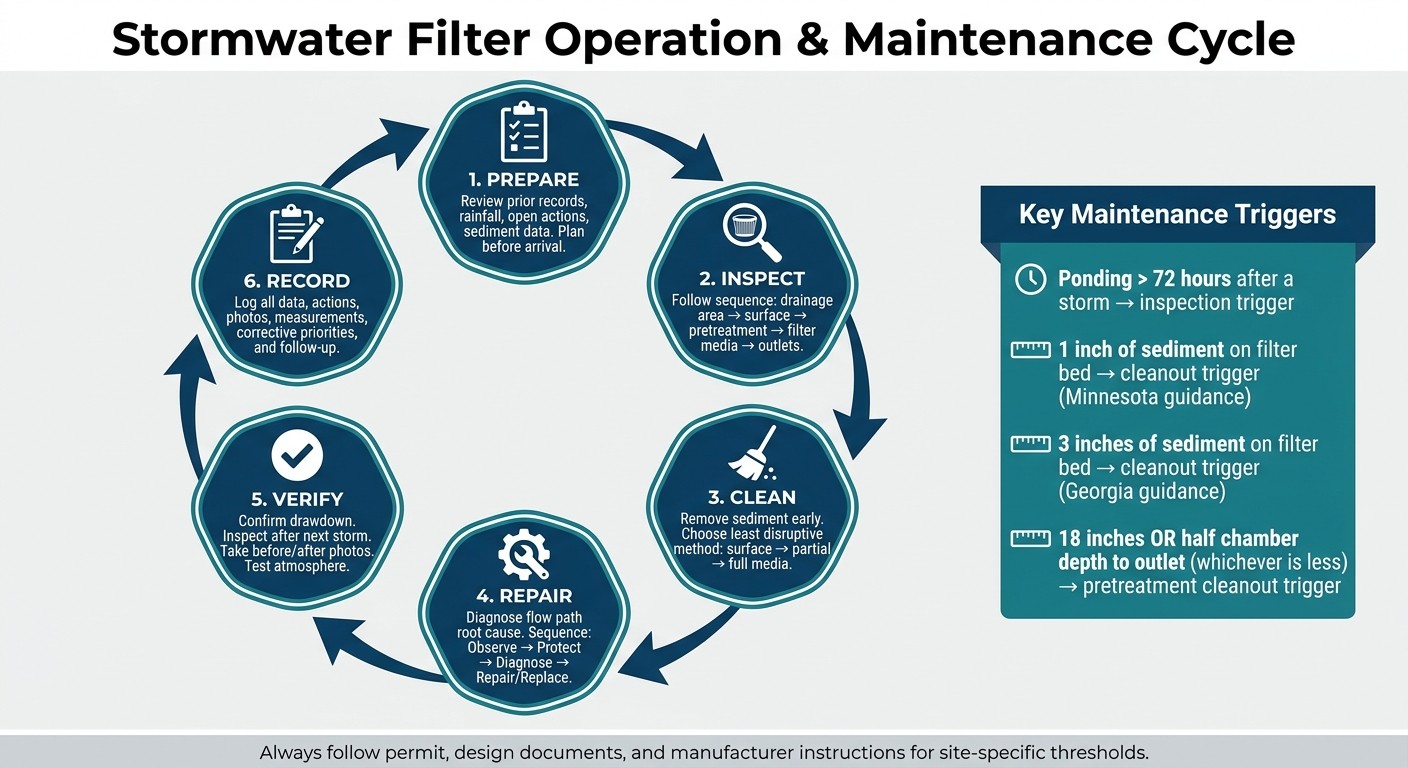
Stormwater Filter O&M Cycle: Inspect, Clean, Repair, Verify
StormFilter Maintenance Demonstration
Build a Defined Inspection Schedule for Stormwater Filters
A strong inspection schedule should fit the site, not just the calendar. The drainage area, pollutant load, permit terms, and maintenance history should set the interval. Start with the permit or approved O&M plan as the base, then adjust based on what the site is telling you. That way, each visit follows the same field process, and your records stay easy to compare over time.
Begin with the permit or approved O&M plan, then tighten the schedule during the first year, after major storms, and any time sediment, ponding, or bypass shows up. Include a post-acceptance baseline inspection, a pre-wet-season check, and event-based inspections after heavy rain, flooding, spills, construction activity, or any known bypass. If sediment hits the action threshold between scheduled visits, or repeated storms lead to clogging or bypass, inspect more often. Only scale back when several inspection cycles show stable conditions and the permit allows it.
Set one local rainfall trigger in the O&M plan and use it the same way every time for event-based inspections. That trigger should shape what the crew checks first once they arrive on site.
Follow a Consistent Field Inspection Sequence
Using the same inspection sequence at every visit makes trends easier to spot and helps prevent missed issues. Before arriving, review prior inspection records, recent rainfall, maintenance work, sediment measurements, bypass reports, and any open corrective actions.
On site, start with the contributing drainage area. Look for exposed soil, construction activity, trash, erosion, ponding, or signs of illicit discharges before moving to the filter itself. Next, inspect visible components from the surface. Do not enter a vault or other confined space unless the required confined-space procedures are in place. Measure sediment depth in pretreatment and filter areas, note any standing water and how long it has remained, and check the filter media for crusting, settlement, or uneven loading. Finish with the inlets, outlets, weirs, risers, underdrains, and bypass structures.
Every visit should end with clear documentation. Record the date and time in local U.S. format, the inspector’s name, weather conditions, recent rainfall, photos from the same locations, component-by-component findings, measurements, any immediate actions taken, corrective-action priorities, the responsible person, and the follow-up date. When you review past maintenance records alongside repeat photos and repeat measurements, it becomes much easier to see whether sediment is building up faster or ponding is lasting longer than it did before.
Check the Components Most Likely to Affect Treatment
Some parts of the system have a much bigger impact on treatment than others. Those parts need close attention at every inspection.
Pretreatment areas and sediment chambers are common collection points for coarse material and sediment. Check for trash, oil sheen, odors, erosion, and sediment depth. Georgia guidance recommends removing sediment from a filter bed when it reaches approximately 3 inches in depth or is visibly clogging the media. [4] Inlets and inlet grates also clog fast, especially during fall, when leaves, trash, and sediment build up. If an inlet blocks, flow can divert before it ever reaches the filter. Check for scour, damaged grates, and restricted inflow.
The filter media surface is the heart of the system. Look for sediment crusting, uneven loading, standing water, settlement, exposed media, or water that is visibly bypassing the media. Georgia guidance flags ponding that lasts more than 72 hours after a storm as an inspection trigger. [4] Access covers and vault openings should be checked at every visit, before any access attempt, for secure fit, corrosion, damage, and unsafe conditions. Underdrains and drain-down paths often reveal trouble through slow drain-down, constant wetness, or sediment discharge instead of an obvious blockage. Outlet structures, weirs, and risers may fail quietly through cracking, corrosion, or minor blockage that slowly causes short-circuiting. And bypass features should remain clear, but they should not be carrying flow during storms the filter was designed to treat. If bypass happens during a design storm, that points to a maintenance problem. [3]
Use an Inspection Table to Guide Field Responses
The table below turns the inspection schedule into field actions by component. These frequencies are starting points for planning. The permit, design documents, manufacturer's instructions, and site history still control the final approach.
Component | Inspection Frequency | Observable Condition | Required Response |
|---|---|---|---|
Pretreatment area and sediment chamber | Baseline; pre-wet-season; annually; after heavy rain or construction | Trash, oil sheen, odors, erosion, sediment depth | Clear trash; remove sediment at the approved threshold; record quantity and condition |
Inlets and grates | Quarterly or site-specific; after storms and leaf fall | Blockage, scour, damaged grates, restricted inflow | Clear debris; stabilize erosion; repair or replace grates; record work |
Filter surface and media | Baseline; annually; after bypass or prolonged ponding | Crusting, uneven loading, standing water, settlement, exposed media | Measure ponding and sediment depth; clean or replace media per the O&M plan; escalate recurring clogging |
Access covers and vault openings | Every inspection; before any access | Loose fit, corrosion, damage, unsafe conditions | Secure or repair covers; restrict access; follow confined-space procedures; record deficiency |
Underdrains and drain-down path | Annually; after persistent ponding or suspected blockage | Slow drain-down, leakage, sediment discharge, blocked flow | Clear or repair drainage path; verify drain-down; record post-repair results |
Outlet, weir, and riser | Annually; after flooding or structural damage | Blockage, erosion, cracking, corrosion, leakage, unusual water levels | Clear blockage; repair structure; stabilize erosion; verify outlet operation |
Bypass and overflow feature | Baseline; pre-wet-season; after bypass or major storms | Obstruction, erosion, unauthorized flow, bypass during treatable events | Clear the route; determine the cause; repair only; resize only with approved design review; record event |
Contributing drainage area | Quarterly or risk-based; after construction, spills, or land-use change | Exposed soil, sediment sources, spills, illicit discharges, changed flow paths | Stop the source, clean the area, notify the authority if needed, and reschedule inspection |
Maintain Filter Media and Remove Sediment Before Capacity Drops
Use inspection results to pick the least disruptive maintenance step that restores drawdown before bypass begins. The goal is simple: act based on what the system is doing now, not on a preset calendar. Set timing from measured sediment loading, drain-down performance, and the condition of key parts.
Choose Between Surface Cleaning, Partial Replacement, and Full Media Replacement
Start with the last inspection report. If sediment is shallow and the media still drains, a light cleaning may do the job. If the upper layer is compacted or discolored but the lower layers still work, replace only the worn section. If bypass keeps happening, drawdown stays slow, or the bed is damaged, the fix usually needs to go deeper.
Maintenance Option | Typical Symptom | Investigation Required | Appropriate Use |
|---|---|---|---|
Surface cleaning | Shallow sediment or localized crusting; underlying media still drains | Measure surface sediment depth; confirm drawdown is within the design limit | Routine removal of debris and shallow deposits before clogging penetrates the media |
Partial media replacement | Persistent ponding, discolored or compacted upper layer, sediment concentrated in the top few inches | Confirm lower media, liner, underdrain, and support layers are intact; identify depth of spent material | Restore infiltration when degradation is localized; remove and replace only the affected upper layer when the lower profile remains serviceable |
Full media or cartridge replacement | Media broadly darkened or spent, repeated bypass, prolonged drawdown, damaged bed, or poor treatment after corrective cleaning | Inspect the full treatment train, underdrain seals, bypass, and structural condition; follow manufacturer requirements | Use when localized work cannot restore hydraulic function or treatment performance |
EPA guidance notes that for perlite media, darkening from white to nearly black indicates exhausted media. [5]
Remove Sediment from Pretreatment Zones and Filter Areas
Measure sediment at several points with a marked rod or depth gauge, and log each reading on its own. Keep sediment depth separate from media depth in your records. That one detail matters, because mixing them up can lead crews to remove treatment media by mistake.
Use the approved O&M threshold for the site. Minnesota guidance sets a common limit at half the chamber depth to the outlet or 18 inches, whichever is less. [1] For filter beds, Minnesota guidance says to remove sediment when buildup goes past 1 inch. [1]
Before removing material, isolate or bypass inflow. Then use vacuum equipment or controlled hand tools. Be careful with exposed liners - dragging hoses or heavy gear across them can turn a routine cleanout into a repair job. If underdrain piping, geotextile, or structural damage becomes visible, stop work at once.
Dispose of Residuals Correctly
Sediment from stormwater filters may contain petroleum, metals, and other pollutants. Separate oily or visibly contaminated material from cleaner sediment as soon as it is removed. When rules require it, characterize the waste and send it only to a disposal or recycling facility allowed to accept that material.
Location | Inspection Indicator | Maintenance Action | Documentation Requirement |
|---|---|---|---|
Sediment chamber cleanout | Sediment reaches the approved depth or volume limit; storage or drawdown is reduced | Vacuum or remove sediment without damaging outlet structures; inspect chamber floor and walls | Record measured depth, estimated volume removed, equipment used, waste profile, disposal facility, and post-cleanout condition |
Filter-bed sediment removal | Surface sediment exceeds the system criterion, crusting develops, or ponding persists beyond the design drawdown time | Skim, rake, or remove the affected layer only as authorized; replace media where required | Record area and depth removed, replacement media specification and quantity, photographs, and post-maintenance drawdown result |
Cartridge cleanout | Sediment or debris accumulates around cartridges or bay floors; flow restriction or bypass occurs | Remove sediment and debris with approved equipment; inspect cartridges and seals; replace damaged elements | Record cartridge condition, sediment depth, cleaning or replacement performed, parts used, and flow verification |
Pretreatment maintenance | Trash, floatables, oil, or sediment reduces available pretreatment storage or threatens the filter | Remove and segregate residuals; clean inlet screens, forebays, sumps, or separators; repair damaged components | Record material type, quantity, contamination observations, containment method, characterization results when applicable, transporter, and destination |
After each cleanout, check that the filter drains within the applicable design drawdown time. Then inspect it again after the next significant storm. That follow-up check helps confirm that infiltration has been restored and that the work did not create preferential flow paths. If drain-down is still slow after cleanout, move to repair-level diagnostics. If cleaning does not restore drain-down, continue to component repair checks.
Repair Components When Performance Triggers Appear
When cleaning stops fixing drawdown, the job shifts from routine maintenance to repair diagnosis. If performance does not come back after cleaning, find the root cause first, then decide whether repair or replacement makes more sense. The goal is simple: move from symptom to corrective action.
A practical sequence is observe → protect and stabilize → diagnose the flow path → repair or replace → verify performance → document and revise triggers. If cleanout fails, repair the flow path or the structure before the filter goes back into service. Record every step before reopening the system.
Address Structural Defects and Blocked Drainage Paths
Trace the full flow path from end to end: inlet, pretreatment, media, underdrain, outlet, overflow, and bypass. A blockage downstream can look just like media failure if you stop the check too early. Prompt action is needed for leaks, damaged access covers, deteriorated concrete, broken seals, failed hinges, corroded hardware, and damaged inlet or outlet structures. Any defect that could let untreated runoff bypass the filter, put the public at risk, or weaken a vault should be treated as urgent, and access should stay restricted until the area is safe. [9]
If ponding continues after cleaning, compare the water level at the filter surface with the level in the underdrain observation well. Surface ponding with no water in the underdrain usually points to a clogged filter layer. Water showing up at both the surface and in the observation well usually points to a blocked underdrain or outlet pipe. Virginia guidance recommends this comparison and separates a blocked pipe that can be flushed from an underdrain that needs replacement when structural damage is present. [11] Don’t pick the fix until the blockage location is confirmed.
Use that diagnosis to target the repair, not the symptom.
Escalate Repeat Ponding, Bypass, and Poor Effluent Indicators
Repeat bypass, unusual odors, discolored media, or declining effluent quality should trigger escalation, not another round of the same work order. Wisconsin guidance notes that high inlet water levels can point to spent or blocked media or membranes, and that sediment buildup in bypass structures creates its own maintenance issues. [10] Fix the root cause before reopening.
Bring in a qualified stormwater professional or engineer when you find structural damage, suspected contamination, confined-space hazards, or repeated treatment failure after corrective work. Filtration guidance also identifies holes, ruts, or other openings in media as possible bypass paths and recommends fixing the underlying cause before replacing the damaged media. [6] Replacing media over a damaged subbase or torn separation fabric just sets up the same failure again.
Verify Repairs and Update the Maintenance Record
A repair is not finished until field verification and written documentation are done. After the work is complete, confirm that covers, hinges, seals, concrete, inlets, outlets, underdrains, flow-control devices, overflow paths, and media or cartridges match the approved configuration. Remove construction debris, then observe or test the system to make sure water follows the intended treatment and discharge path without leakage, obstruction, or early bypass. Take dated photos from the same locations before and after the repair so the restored condition is easy to confirm. [6]
Record the date, site conditions, defect, root cause, work performed, materials used, waste disposition, verification results, and follow-up date. If the repair points to a repeating cause - such as repeated sediment loading, frequent debris buildup, or a second underdrain blockage - update the maintenance plan with a better inspection frequency or cleaning trigger. Use only thresholds set by the permit, design documents, manufacturer instructions, or applicable guidance. [7][8]
Carry the updated record into the next inspection cycle.
Apply Safety Controls and Track Performance Over Time
Follow Field Safety Procedures for Vaults, Sediment, and Public Access Areas
Once cleanouts and repairs become routine, safety controls and steady recordkeeping make the work easier to manage. The goal is simple: crews need to inspect, clean, and fix the system without turning maintenance into a hazard of its own.
Treat every vault or chamber as a confined space until a qualified person evaluates it. Under OSHA’s permit-required confined-space framework, a space must be handled as a permit space when it contains a hazardous atmosphere or another recognized life-safety hazard.[13][16] Start with the simplest question: can the work be done from the surface? If not, and entry is needed, follow the site confined-space permit and entry plan before anyone goes in.
When entry is allowed, test the atmosphere with a calibrated, direct-reading instrument in this order: oxygen first, then combustible gases and vapors, then toxic contaminants such as hydrogen sulfide.[18][19] Test at more than one elevation, since gases can settle in layers, and keep monitoring during the entire entry. Use forced-air ventilation when it can control atmospheric hazards, but don’t treat ventilation as a stand-in for testing or continuous monitoring. Keep dependable voice or radio contact between entrants and the attendant. Each entrant should wear a properly fitted full-body harness and retrieval line unless the employer documents that another option is safer or feasible.[15] A non-entry rescue system should be ready whenever feasible. Workers must leave at once if monitor alarms sound, ventilation stops working, communication is lost, conditions shift, or the entry supervisor orders evacuation.[12]
For surface work, match PPE to the site hazard assessment. Keep sediment off skin and away from food, ban eating or drinking in the work area, and keep a spill kit and hand-washing water on site. Before opening any access point in or near a roadway, prepare a site-specific traffic-control plan that follows the current edition of the Manual on Uniform Traffic Control Devices. Never leave an open vault, removed grate, or excavation unattended. Secure covers and barriers every time the crew steps away.[17][19][20]
Once the crew is protected, record the same field conditions on each visit so you can compare system performance over time.
Track the Data That Show Whether Maintenance Is Working
Field notes only help if they’re recorded the same way each time. Good records shift a program from reactive maintenance to managed maintenance. Create one asset record for each filter and connect it to the location, photos, and related records. At minimum, record the address or coordinates; owner and responsible maintenance organization; system type; drainage area; design flow or treatment capacity; filter dimensions; media type and specification; access points; installation date; inspection and maintenance history; and known site constraints.[2]
Use one inspection form every time so results line up across visits. The table below shows the core fields that connect what crews see in the field to how the system is actually performing:
Data Category | What to Record | Why It Matters |
|---|---|---|
Hydraulic performance | Ponding depth and duration, drawdown time, bypass events | Confirms treatment capacity and flags clogging |
Physical condition | Sediment depth (in inches), media surface, cartridge or screen condition, structural defects | Triggers cleaning, repair, or replacement |
Rainfall context | Inspection date, recent rainfall amount and intensity, antecedent dry period | Makes drawdown comparisons valid across visits |
Operations | Labor hours, materials used, removed volume (cubic yards or gallons), disposal destination | Supports budgeting and disposal compliance |
Verification | Post-maintenance drawdown test result, verification result | Closes the loop on whether the work restored function |
Measure sediment depth with a probe and compare it against the outlet invert or the manufacturer’s maximum allowed level. Don’t estimate it by eye.[14] If a permit requires it, add flow, turbidity, or influent and effluent water-quality measurements to the record.
Conclusion: Use Maintenance Records to Improve Operating Plans
Trend review turns routine inspection logs into maintenance triggers. Review trends at least once a year and after major storms. If drawdown time keeps increasing across inspection cycles, that points to clogging even when sediment depth still falls within allowed limits. That pattern should trigger a media inspection and a post-cleaning drawdown test, not just another repeat of the same work order. If storms keep leaving behind high sediment loads, it may make sense to clean pretreatment units more often even when the filter still appears to be working. This kind of review helps crews act before flooding, bypass, or permit problems show up.
Use inspection, cleaning, repair, verification, and trend review as one operating cycle. Inspect on a set schedule, maintain media before clogging spreads, remove sediment before storage and treatment capacity drop, repair defects when performance triggers appear, and adjust thresholds based on what the trend data shows.
FAQs
How do I know if my stormwater filter needs cleaning or repair?
Use a performance monitoring program that combines automated sensors with regular on-site inspections. Track flow, water quality, and infiltration to make sure the filter is doing the job it was built to do.
Just as important, watch for clear warning signs in the field. Sediment buildup in forebays and inlets, structural damage, and reduced capacity can all signal that the system needs cleaning or immediate repair.
What should be documented after each stormwater filter inspection?
After each stormwater filter inspection, document what you found and what you did. Include:
inspection findings
maintenance completed, such as sediment removal
repairs that are needed or have been finished
any safety issues noted
Also record performance results, such as flow rates and water quality measurements when available. This helps you track whether the filter is still working as designed.
When does stormwater filter maintenance become a safety issue?
Stormwater filter maintenance turns into a safety issue when inspections or repairs are put off and the filter can no longer do its job. That risk shows up fast when sediment builds up or the media gets clogged, slowing flow, blocking it, or pushing the system toward overflow or failure.
A clear safety trigger is any sign that flow control structures or filter capacity are no longer working as intended. For example, heavy sediment buildup that hurts performance needs prompt action rather than waiting for the next check.
Related Blog Posts
Latest Articles
©2025

Narrative Change and Power Building: The Missing Half of Advocacy
Narrative change is the process of disrupting dominant narratives that normalize inequity and advancing new narratives from historically marginalized communities.

Funding Resilience Without Federal Grants
BRIC is unreliable and FEMA is shrinking. Here's how cities fund climate resilience with dedicated revenue, blended finance, and a coordinating authority.

The ESG Blind Spot: How AI Is Finding Risks in Companies Nobody Else Is Watching
Norway's sovereign wealth fund uses AI to screen 7,200 portfolio companies for forced labor and corruption within 24 hours. The real story is the emerging-market coverage gap that traditional ESG data vendors miss — and what it means for any company with a global supply chain.
Narrative Change and Power Building: The Missing Half of Advocacy
Narrative change is the process of disrupting dominant narratives that normalize inequity and advancing new narratives from historically marginalized communities.
Funding Resilience Without Federal Grants
BRIC is unreliable and FEMA is shrinking. Here's how cities fund climate resilience with dedicated revenue, blended finance, and a coordinating authority.
The ESG Blind Spot: How AI Is Finding Risks in Companies Nobody Else Is Watching
Norway's sovereign wealth fund uses AI to screen 7,200 portfolio companies for forced labor and corruption within 24 hours. The real story is the emerging-market coverage gap that traditional ESG data vendors miss — and what it means for any company with a global supply chain.
FAQ
01
What does it really mean to “redefine profit”?
02
What makes Council Fire different?
03
Who does Council Fire work with?
04
What does working with Council Fire actually look like?
05
How does Council Fire help organizations turn big goals into action?
06
How does Council Fire define and measure success?
Sep 24, 2026
Operation and Maintenance for Stormwater Filters
Sustainability Strategy
In This Article
Inspect, measure, and act: a fixed O&M cycle to prevent clogging, bypass, and filter failure.
Operation and Maintenance for Stormwater Filters
If a stormwater filter ponds for more than 72 hours, bypasses flow, or shows sediment buildup of 1 inch to 3 inches in key areas, I treat that as a maintenance trigger - not a wait-and-see issue. The article’s core message is simple: I keep filters working by following a fixed cycle of prepare, inspect, clean, repair, verify, and record.
If I had to boil the whole article down, it would be this:
I inspect on a set schedule based on the permit, site history, and storm events.
I check the highest-risk parts first: pretreatment zones, inlets, media surface, underdrains, outlets, and bypass features.
I remove sediment before capacity drops, using field measurements instead of guesses.
I choose the lightest fix that works - surface cleaning, partial media replacement, or full replacement.
I move to repairs when cleaning no longer fixes drawdown.
I verify every repair and log every visit with photos, rainfall, measurements, and follow-up dates.
I treat vaults and chambers as confined spaces unless a qualified person says otherwise.
A few numbers in the article matter right away:
Ponding longer than 72 hours is a warning sign.
Some guidance uses 1 inch of sediment on filter beds as a cleanout trigger.
Pretreatment cleanout may be triggered at 18 inches or half the chamber depth to the outlet, whichever is less.
Sediment around 3 inches on a filter bed can also signal clogging, depending on the guidance used for the site.
What matters most is not the calendar alone. Measured sediment depth, drawdown time, bypass, and repeat trouble after storms tell me when the filter needs work. Good maintenance records then help me tighten the inspection plan and stop the same problems from coming back.
Stormwater Filter O&M Cycle: Inspect, Clean, Repair, Verify
StormFilter Maintenance Demonstration
Build a Defined Inspection Schedule for Stormwater Filters
A strong inspection schedule should fit the site, not just the calendar. The drainage area, pollutant load, permit terms, and maintenance history should set the interval. Start with the permit or approved O&M plan as the base, then adjust based on what the site is telling you. That way, each visit follows the same field process, and your records stay easy to compare over time.
Begin with the permit or approved O&M plan, then tighten the schedule during the first year, after major storms, and any time sediment, ponding, or bypass shows up. Include a post-acceptance baseline inspection, a pre-wet-season check, and event-based inspections after heavy rain, flooding, spills, construction activity, or any known bypass. If sediment hits the action threshold between scheduled visits, or repeated storms lead to clogging or bypass, inspect more often. Only scale back when several inspection cycles show stable conditions and the permit allows it.
Set one local rainfall trigger in the O&M plan and use it the same way every time for event-based inspections. That trigger should shape what the crew checks first once they arrive on site.
Follow a Consistent Field Inspection Sequence
Using the same inspection sequence at every visit makes trends easier to spot and helps prevent missed issues. Before arriving, review prior inspection records, recent rainfall, maintenance work, sediment measurements, bypass reports, and any open corrective actions.
On site, start with the contributing drainage area. Look for exposed soil, construction activity, trash, erosion, ponding, or signs of illicit discharges before moving to the filter itself. Next, inspect visible components from the surface. Do not enter a vault or other confined space unless the required confined-space procedures are in place. Measure sediment depth in pretreatment and filter areas, note any standing water and how long it has remained, and check the filter media for crusting, settlement, or uneven loading. Finish with the inlets, outlets, weirs, risers, underdrains, and bypass structures.
Every visit should end with clear documentation. Record the date and time in local U.S. format, the inspector’s name, weather conditions, recent rainfall, photos from the same locations, component-by-component findings, measurements, any immediate actions taken, corrective-action priorities, the responsible person, and the follow-up date. When you review past maintenance records alongside repeat photos and repeat measurements, it becomes much easier to see whether sediment is building up faster or ponding is lasting longer than it did before.
Check the Components Most Likely to Affect Treatment
Some parts of the system have a much bigger impact on treatment than others. Those parts need close attention at every inspection.
Pretreatment areas and sediment chambers are common collection points for coarse material and sediment. Check for trash, oil sheen, odors, erosion, and sediment depth. Georgia guidance recommends removing sediment from a filter bed when it reaches approximately 3 inches in depth or is visibly clogging the media. [4] Inlets and inlet grates also clog fast, especially during fall, when leaves, trash, and sediment build up. If an inlet blocks, flow can divert before it ever reaches the filter. Check for scour, damaged grates, and restricted inflow.
The filter media surface is the heart of the system. Look for sediment crusting, uneven loading, standing water, settlement, exposed media, or water that is visibly bypassing the media. Georgia guidance flags ponding that lasts more than 72 hours after a storm as an inspection trigger. [4] Access covers and vault openings should be checked at every visit, before any access attempt, for secure fit, corrosion, damage, and unsafe conditions. Underdrains and drain-down paths often reveal trouble through slow drain-down, constant wetness, or sediment discharge instead of an obvious blockage. Outlet structures, weirs, and risers may fail quietly through cracking, corrosion, or minor blockage that slowly causes short-circuiting. And bypass features should remain clear, but they should not be carrying flow during storms the filter was designed to treat. If bypass happens during a design storm, that points to a maintenance problem. [3]
Use an Inspection Table to Guide Field Responses
The table below turns the inspection schedule into field actions by component. These frequencies are starting points for planning. The permit, design documents, manufacturer's instructions, and site history still control the final approach.
Component | Inspection Frequency | Observable Condition | Required Response |
|---|---|---|---|
Pretreatment area and sediment chamber | Baseline; pre-wet-season; annually; after heavy rain or construction | Trash, oil sheen, odors, erosion, sediment depth | Clear trash; remove sediment at the approved threshold; record quantity and condition |
Inlets and grates | Quarterly or site-specific; after storms and leaf fall | Blockage, scour, damaged grates, restricted inflow | Clear debris; stabilize erosion; repair or replace grates; record work |
Filter surface and media | Baseline; annually; after bypass or prolonged ponding | Crusting, uneven loading, standing water, settlement, exposed media | Measure ponding and sediment depth; clean or replace media per the O&M plan; escalate recurring clogging |
Access covers and vault openings | Every inspection; before any access | Loose fit, corrosion, damage, unsafe conditions | Secure or repair covers; restrict access; follow confined-space procedures; record deficiency |
Underdrains and drain-down path | Annually; after persistent ponding or suspected blockage | Slow drain-down, leakage, sediment discharge, blocked flow | Clear or repair drainage path; verify drain-down; record post-repair results |
Outlet, weir, and riser | Annually; after flooding or structural damage | Blockage, erosion, cracking, corrosion, leakage, unusual water levels | Clear blockage; repair structure; stabilize erosion; verify outlet operation |
Bypass and overflow feature | Baseline; pre-wet-season; after bypass or major storms | Obstruction, erosion, unauthorized flow, bypass during treatable events | Clear the route; determine the cause; repair only; resize only with approved design review; record event |
Contributing drainage area | Quarterly or risk-based; after construction, spills, or land-use change | Exposed soil, sediment sources, spills, illicit discharges, changed flow paths | Stop the source, clean the area, notify the authority if needed, and reschedule inspection |
Maintain Filter Media and Remove Sediment Before Capacity Drops
Use inspection results to pick the least disruptive maintenance step that restores drawdown before bypass begins. The goal is simple: act based on what the system is doing now, not on a preset calendar. Set timing from measured sediment loading, drain-down performance, and the condition of key parts.
Choose Between Surface Cleaning, Partial Replacement, and Full Media Replacement
Start with the last inspection report. If sediment is shallow and the media still drains, a light cleaning may do the job. If the upper layer is compacted or discolored but the lower layers still work, replace only the worn section. If bypass keeps happening, drawdown stays slow, or the bed is damaged, the fix usually needs to go deeper.
Maintenance Option | Typical Symptom | Investigation Required | Appropriate Use |
|---|---|---|---|
Surface cleaning | Shallow sediment or localized crusting; underlying media still drains | Measure surface sediment depth; confirm drawdown is within the design limit | Routine removal of debris and shallow deposits before clogging penetrates the media |
Partial media replacement | Persistent ponding, discolored or compacted upper layer, sediment concentrated in the top few inches | Confirm lower media, liner, underdrain, and support layers are intact; identify depth of spent material | Restore infiltration when degradation is localized; remove and replace only the affected upper layer when the lower profile remains serviceable |
Full media or cartridge replacement | Media broadly darkened or spent, repeated bypass, prolonged drawdown, damaged bed, or poor treatment after corrective cleaning | Inspect the full treatment train, underdrain seals, bypass, and structural condition; follow manufacturer requirements | Use when localized work cannot restore hydraulic function or treatment performance |
EPA guidance notes that for perlite media, darkening from white to nearly black indicates exhausted media. [5]
Remove Sediment from Pretreatment Zones and Filter Areas
Measure sediment at several points with a marked rod or depth gauge, and log each reading on its own. Keep sediment depth separate from media depth in your records. That one detail matters, because mixing them up can lead crews to remove treatment media by mistake.
Use the approved O&M threshold for the site. Minnesota guidance sets a common limit at half the chamber depth to the outlet or 18 inches, whichever is less. [1] For filter beds, Minnesota guidance says to remove sediment when buildup goes past 1 inch. [1]
Before removing material, isolate or bypass inflow. Then use vacuum equipment or controlled hand tools. Be careful with exposed liners - dragging hoses or heavy gear across them can turn a routine cleanout into a repair job. If underdrain piping, geotextile, or structural damage becomes visible, stop work at once.
Dispose of Residuals Correctly
Sediment from stormwater filters may contain petroleum, metals, and other pollutants. Separate oily or visibly contaminated material from cleaner sediment as soon as it is removed. When rules require it, characterize the waste and send it only to a disposal or recycling facility allowed to accept that material.
Location | Inspection Indicator | Maintenance Action | Documentation Requirement |
|---|---|---|---|
Sediment chamber cleanout | Sediment reaches the approved depth or volume limit; storage or drawdown is reduced | Vacuum or remove sediment without damaging outlet structures; inspect chamber floor and walls | Record measured depth, estimated volume removed, equipment used, waste profile, disposal facility, and post-cleanout condition |
Filter-bed sediment removal | Surface sediment exceeds the system criterion, crusting develops, or ponding persists beyond the design drawdown time | Skim, rake, or remove the affected layer only as authorized; replace media where required | Record area and depth removed, replacement media specification and quantity, photographs, and post-maintenance drawdown result |
Cartridge cleanout | Sediment or debris accumulates around cartridges or bay floors; flow restriction or bypass occurs | Remove sediment and debris with approved equipment; inspect cartridges and seals; replace damaged elements | Record cartridge condition, sediment depth, cleaning or replacement performed, parts used, and flow verification |
Pretreatment maintenance | Trash, floatables, oil, or sediment reduces available pretreatment storage or threatens the filter | Remove and segregate residuals; clean inlet screens, forebays, sumps, or separators; repair damaged components | Record material type, quantity, contamination observations, containment method, characterization results when applicable, transporter, and destination |
After each cleanout, check that the filter drains within the applicable design drawdown time. Then inspect it again after the next significant storm. That follow-up check helps confirm that infiltration has been restored and that the work did not create preferential flow paths. If drain-down is still slow after cleanout, move to repair-level diagnostics. If cleaning does not restore drain-down, continue to component repair checks.
Repair Components When Performance Triggers Appear
When cleaning stops fixing drawdown, the job shifts from routine maintenance to repair diagnosis. If performance does not come back after cleaning, find the root cause first, then decide whether repair or replacement makes more sense. The goal is simple: move from symptom to corrective action.
A practical sequence is observe → protect and stabilize → diagnose the flow path → repair or replace → verify performance → document and revise triggers. If cleanout fails, repair the flow path or the structure before the filter goes back into service. Record every step before reopening the system.
Address Structural Defects and Blocked Drainage Paths
Trace the full flow path from end to end: inlet, pretreatment, media, underdrain, outlet, overflow, and bypass. A blockage downstream can look just like media failure if you stop the check too early. Prompt action is needed for leaks, damaged access covers, deteriorated concrete, broken seals, failed hinges, corroded hardware, and damaged inlet or outlet structures. Any defect that could let untreated runoff bypass the filter, put the public at risk, or weaken a vault should be treated as urgent, and access should stay restricted until the area is safe. [9]
If ponding continues after cleaning, compare the water level at the filter surface with the level in the underdrain observation well. Surface ponding with no water in the underdrain usually points to a clogged filter layer. Water showing up at both the surface and in the observation well usually points to a blocked underdrain or outlet pipe. Virginia guidance recommends this comparison and separates a blocked pipe that can be flushed from an underdrain that needs replacement when structural damage is present. [11] Don’t pick the fix until the blockage location is confirmed.
Use that diagnosis to target the repair, not the symptom.
Escalate Repeat Ponding, Bypass, and Poor Effluent Indicators
Repeat bypass, unusual odors, discolored media, or declining effluent quality should trigger escalation, not another round of the same work order. Wisconsin guidance notes that high inlet water levels can point to spent or blocked media or membranes, and that sediment buildup in bypass structures creates its own maintenance issues. [10] Fix the root cause before reopening.
Bring in a qualified stormwater professional or engineer when you find structural damage, suspected contamination, confined-space hazards, or repeated treatment failure after corrective work. Filtration guidance also identifies holes, ruts, or other openings in media as possible bypass paths and recommends fixing the underlying cause before replacing the damaged media. [6] Replacing media over a damaged subbase or torn separation fabric just sets up the same failure again.
Verify Repairs and Update the Maintenance Record
A repair is not finished until field verification and written documentation are done. After the work is complete, confirm that covers, hinges, seals, concrete, inlets, outlets, underdrains, flow-control devices, overflow paths, and media or cartridges match the approved configuration. Remove construction debris, then observe or test the system to make sure water follows the intended treatment and discharge path without leakage, obstruction, or early bypass. Take dated photos from the same locations before and after the repair so the restored condition is easy to confirm. [6]
Record the date, site conditions, defect, root cause, work performed, materials used, waste disposition, verification results, and follow-up date. If the repair points to a repeating cause - such as repeated sediment loading, frequent debris buildup, or a second underdrain blockage - update the maintenance plan with a better inspection frequency or cleaning trigger. Use only thresholds set by the permit, design documents, manufacturer instructions, or applicable guidance. [7][8]
Carry the updated record into the next inspection cycle.
Apply Safety Controls and Track Performance Over Time
Follow Field Safety Procedures for Vaults, Sediment, and Public Access Areas
Once cleanouts and repairs become routine, safety controls and steady recordkeeping make the work easier to manage. The goal is simple: crews need to inspect, clean, and fix the system without turning maintenance into a hazard of its own.
Treat every vault or chamber as a confined space until a qualified person evaluates it. Under OSHA’s permit-required confined-space framework, a space must be handled as a permit space when it contains a hazardous atmosphere or another recognized life-safety hazard.[13][16] Start with the simplest question: can the work be done from the surface? If not, and entry is needed, follow the site confined-space permit and entry plan before anyone goes in.
When entry is allowed, test the atmosphere with a calibrated, direct-reading instrument in this order: oxygen first, then combustible gases and vapors, then toxic contaminants such as hydrogen sulfide.[18][19] Test at more than one elevation, since gases can settle in layers, and keep monitoring during the entire entry. Use forced-air ventilation when it can control atmospheric hazards, but don’t treat ventilation as a stand-in for testing or continuous monitoring. Keep dependable voice or radio contact between entrants and the attendant. Each entrant should wear a properly fitted full-body harness and retrieval line unless the employer documents that another option is safer or feasible.[15] A non-entry rescue system should be ready whenever feasible. Workers must leave at once if monitor alarms sound, ventilation stops working, communication is lost, conditions shift, or the entry supervisor orders evacuation.[12]
For surface work, match PPE to the site hazard assessment. Keep sediment off skin and away from food, ban eating or drinking in the work area, and keep a spill kit and hand-washing water on site. Before opening any access point in or near a roadway, prepare a site-specific traffic-control plan that follows the current edition of the Manual on Uniform Traffic Control Devices. Never leave an open vault, removed grate, or excavation unattended. Secure covers and barriers every time the crew steps away.[17][19][20]
Once the crew is protected, record the same field conditions on each visit so you can compare system performance over time.
Track the Data That Show Whether Maintenance Is Working
Field notes only help if they’re recorded the same way each time. Good records shift a program from reactive maintenance to managed maintenance. Create one asset record for each filter and connect it to the location, photos, and related records. At minimum, record the address or coordinates; owner and responsible maintenance organization; system type; drainage area; design flow or treatment capacity; filter dimensions; media type and specification; access points; installation date; inspection and maintenance history; and known site constraints.[2]
Use one inspection form every time so results line up across visits. The table below shows the core fields that connect what crews see in the field to how the system is actually performing:
Data Category | What to Record | Why It Matters |
|---|---|---|
Hydraulic performance | Ponding depth and duration, drawdown time, bypass events | Confirms treatment capacity and flags clogging |
Physical condition | Sediment depth (in inches), media surface, cartridge or screen condition, structural defects | Triggers cleaning, repair, or replacement |
Rainfall context | Inspection date, recent rainfall amount and intensity, antecedent dry period | Makes drawdown comparisons valid across visits |
Operations | Labor hours, materials used, removed volume (cubic yards or gallons), disposal destination | Supports budgeting and disposal compliance |
Verification | Post-maintenance drawdown test result, verification result | Closes the loop on whether the work restored function |
Measure sediment depth with a probe and compare it against the outlet invert or the manufacturer’s maximum allowed level. Don’t estimate it by eye.[14] If a permit requires it, add flow, turbidity, or influent and effluent water-quality measurements to the record.
Conclusion: Use Maintenance Records to Improve Operating Plans
Trend review turns routine inspection logs into maintenance triggers. Review trends at least once a year and after major storms. If drawdown time keeps increasing across inspection cycles, that points to clogging even when sediment depth still falls within allowed limits. That pattern should trigger a media inspection and a post-cleaning drawdown test, not just another repeat of the same work order. If storms keep leaving behind high sediment loads, it may make sense to clean pretreatment units more often even when the filter still appears to be working. This kind of review helps crews act before flooding, bypass, or permit problems show up.
Use inspection, cleaning, repair, verification, and trend review as one operating cycle. Inspect on a set schedule, maintain media before clogging spreads, remove sediment before storage and treatment capacity drop, repair defects when performance triggers appear, and adjust thresholds based on what the trend data shows.
FAQs
How do I know if my stormwater filter needs cleaning or repair?
Use a performance monitoring program that combines automated sensors with regular on-site inspections. Track flow, water quality, and infiltration to make sure the filter is doing the job it was built to do.
Just as important, watch for clear warning signs in the field. Sediment buildup in forebays and inlets, structural damage, and reduced capacity can all signal that the system needs cleaning or immediate repair.
What should be documented after each stormwater filter inspection?
After each stormwater filter inspection, document what you found and what you did. Include:
inspection findings
maintenance completed, such as sediment removal
repairs that are needed or have been finished
any safety issues noted
Also record performance results, such as flow rates and water quality measurements when available. This helps you track whether the filter is still working as designed.
When does stormwater filter maintenance become a safety issue?
Stormwater filter maintenance turns into a safety issue when inspections or repairs are put off and the filter can no longer do its job. That risk shows up fast when sediment builds up or the media gets clogged, slowing flow, blocking it, or pushing the system toward overflow or failure.
A clear safety trigger is any sign that flow control structures or filter capacity are no longer working as intended. For example, heavy sediment buildup that hurts performance needs prompt action rather than waiting for the next check.
Related Blog Posts
Latest Articles
©2025
Narrative Change and Power Building: The Missing Half of Advocacy
Narrative change is the process of disrupting dominant narratives that normalize inequity and advancing new narratives from historically marginalized communities.
Funding Resilience Without Federal Grants
BRIC is unreliable and FEMA is shrinking. Here's how cities fund climate resilience with dedicated revenue, blended finance, and a coordinating authority.
The ESG Blind Spot: How AI Is Finding Risks in Companies Nobody Else Is Watching
Norway's sovereign wealth fund uses AI to screen 7,200 portfolio companies for forced labor and corruption within 24 hours. The real story is the emerging-market coverage gap that traditional ESG data vendors miss — and what it means for any company with a global supply chain.
FAQ
01
What does it really mean to “redefine profit”?
02
What makes Council Fire different?
03
Who does Council Fire work with?
04
What does working with Council Fire actually look like?
05
How does Council Fire help organizations turn big goals into action?
06
How does Council Fire define and measure success?
Sep 24, 2026
Operation and Maintenance for Stormwater Filters
Sustainability Strategy
In This Article
Inspect, measure, and act: a fixed O&M cycle to prevent clogging, bypass, and filter failure.
Operation and Maintenance for Stormwater Filters
If a stormwater filter ponds for more than 72 hours, bypasses flow, or shows sediment buildup of 1 inch to 3 inches in key areas, I treat that as a maintenance trigger - not a wait-and-see issue. The article’s core message is simple: I keep filters working by following a fixed cycle of prepare, inspect, clean, repair, verify, and record.
If I had to boil the whole article down, it would be this:
I inspect on a set schedule based on the permit, site history, and storm events.
I check the highest-risk parts first: pretreatment zones, inlets, media surface, underdrains, outlets, and bypass features.
I remove sediment before capacity drops, using field measurements instead of guesses.
I choose the lightest fix that works - surface cleaning, partial media replacement, or full replacement.
I move to repairs when cleaning no longer fixes drawdown.
I verify every repair and log every visit with photos, rainfall, measurements, and follow-up dates.
I treat vaults and chambers as confined spaces unless a qualified person says otherwise.
A few numbers in the article matter right away:
Ponding longer than 72 hours is a warning sign.
Some guidance uses 1 inch of sediment on filter beds as a cleanout trigger.
Pretreatment cleanout may be triggered at 18 inches or half the chamber depth to the outlet, whichever is less.
Sediment around 3 inches on a filter bed can also signal clogging, depending on the guidance used for the site.
What matters most is not the calendar alone. Measured sediment depth, drawdown time, bypass, and repeat trouble after storms tell me when the filter needs work. Good maintenance records then help me tighten the inspection plan and stop the same problems from coming back.
Stormwater Filter O&M Cycle: Inspect, Clean, Repair, Verify
StormFilter Maintenance Demonstration
Build a Defined Inspection Schedule for Stormwater Filters
A strong inspection schedule should fit the site, not just the calendar. The drainage area, pollutant load, permit terms, and maintenance history should set the interval. Start with the permit or approved O&M plan as the base, then adjust based on what the site is telling you. That way, each visit follows the same field process, and your records stay easy to compare over time.
Begin with the permit or approved O&M plan, then tighten the schedule during the first year, after major storms, and any time sediment, ponding, or bypass shows up. Include a post-acceptance baseline inspection, a pre-wet-season check, and event-based inspections after heavy rain, flooding, spills, construction activity, or any known bypass. If sediment hits the action threshold between scheduled visits, or repeated storms lead to clogging or bypass, inspect more often. Only scale back when several inspection cycles show stable conditions and the permit allows it.
Set one local rainfall trigger in the O&M plan and use it the same way every time for event-based inspections. That trigger should shape what the crew checks first once they arrive on site.
Follow a Consistent Field Inspection Sequence
Using the same inspection sequence at every visit makes trends easier to spot and helps prevent missed issues. Before arriving, review prior inspection records, recent rainfall, maintenance work, sediment measurements, bypass reports, and any open corrective actions.
On site, start with the contributing drainage area. Look for exposed soil, construction activity, trash, erosion, ponding, or signs of illicit discharges before moving to the filter itself. Next, inspect visible components from the surface. Do not enter a vault or other confined space unless the required confined-space procedures are in place. Measure sediment depth in pretreatment and filter areas, note any standing water and how long it has remained, and check the filter media for crusting, settlement, or uneven loading. Finish with the inlets, outlets, weirs, risers, underdrains, and bypass structures.
Every visit should end with clear documentation. Record the date and time in local U.S. format, the inspector’s name, weather conditions, recent rainfall, photos from the same locations, component-by-component findings, measurements, any immediate actions taken, corrective-action priorities, the responsible person, and the follow-up date. When you review past maintenance records alongside repeat photos and repeat measurements, it becomes much easier to see whether sediment is building up faster or ponding is lasting longer than it did before.
Check the Components Most Likely to Affect Treatment
Some parts of the system have a much bigger impact on treatment than others. Those parts need close attention at every inspection.
Pretreatment areas and sediment chambers are common collection points for coarse material and sediment. Check for trash, oil sheen, odors, erosion, and sediment depth. Georgia guidance recommends removing sediment from a filter bed when it reaches approximately 3 inches in depth or is visibly clogging the media. [4] Inlets and inlet grates also clog fast, especially during fall, when leaves, trash, and sediment build up. If an inlet blocks, flow can divert before it ever reaches the filter. Check for scour, damaged grates, and restricted inflow.
The filter media surface is the heart of the system. Look for sediment crusting, uneven loading, standing water, settlement, exposed media, or water that is visibly bypassing the media. Georgia guidance flags ponding that lasts more than 72 hours after a storm as an inspection trigger. [4] Access covers and vault openings should be checked at every visit, before any access attempt, for secure fit, corrosion, damage, and unsafe conditions. Underdrains and drain-down paths often reveal trouble through slow drain-down, constant wetness, or sediment discharge instead of an obvious blockage. Outlet structures, weirs, and risers may fail quietly through cracking, corrosion, or minor blockage that slowly causes short-circuiting. And bypass features should remain clear, but they should not be carrying flow during storms the filter was designed to treat. If bypass happens during a design storm, that points to a maintenance problem. [3]
Use an Inspection Table to Guide Field Responses
The table below turns the inspection schedule into field actions by component. These frequencies are starting points for planning. The permit, design documents, manufacturer's instructions, and site history still control the final approach.
Component | Inspection Frequency | Observable Condition | Required Response |
|---|---|---|---|
Pretreatment area and sediment chamber | Baseline; pre-wet-season; annually; after heavy rain or construction | Trash, oil sheen, odors, erosion, sediment depth | Clear trash; remove sediment at the approved threshold; record quantity and condition |
Inlets and grates | Quarterly or site-specific; after storms and leaf fall | Blockage, scour, damaged grates, restricted inflow | Clear debris; stabilize erosion; repair or replace grates; record work |
Filter surface and media | Baseline; annually; after bypass or prolonged ponding | Crusting, uneven loading, standing water, settlement, exposed media | Measure ponding and sediment depth; clean or replace media per the O&M plan; escalate recurring clogging |
Access covers and vault openings | Every inspection; before any access | Loose fit, corrosion, damage, unsafe conditions | Secure or repair covers; restrict access; follow confined-space procedures; record deficiency |
Underdrains and drain-down path | Annually; after persistent ponding or suspected blockage | Slow drain-down, leakage, sediment discharge, blocked flow | Clear or repair drainage path; verify drain-down; record post-repair results |
Outlet, weir, and riser | Annually; after flooding or structural damage | Blockage, erosion, cracking, corrosion, leakage, unusual water levels | Clear blockage; repair structure; stabilize erosion; verify outlet operation |
Bypass and overflow feature | Baseline; pre-wet-season; after bypass or major storms | Obstruction, erosion, unauthorized flow, bypass during treatable events | Clear the route; determine the cause; repair only; resize only with approved design review; record event |
Contributing drainage area | Quarterly or risk-based; after construction, spills, or land-use change | Exposed soil, sediment sources, spills, illicit discharges, changed flow paths | Stop the source, clean the area, notify the authority if needed, and reschedule inspection |
Maintain Filter Media and Remove Sediment Before Capacity Drops
Use inspection results to pick the least disruptive maintenance step that restores drawdown before bypass begins. The goal is simple: act based on what the system is doing now, not on a preset calendar. Set timing from measured sediment loading, drain-down performance, and the condition of key parts.
Choose Between Surface Cleaning, Partial Replacement, and Full Media Replacement
Start with the last inspection report. If sediment is shallow and the media still drains, a light cleaning may do the job. If the upper layer is compacted or discolored but the lower layers still work, replace only the worn section. If bypass keeps happening, drawdown stays slow, or the bed is damaged, the fix usually needs to go deeper.
Maintenance Option | Typical Symptom | Investigation Required | Appropriate Use |
|---|---|---|---|
Surface cleaning | Shallow sediment or localized crusting; underlying media still drains | Measure surface sediment depth; confirm drawdown is within the design limit | Routine removal of debris and shallow deposits before clogging penetrates the media |
Partial media replacement | Persistent ponding, discolored or compacted upper layer, sediment concentrated in the top few inches | Confirm lower media, liner, underdrain, and support layers are intact; identify depth of spent material | Restore infiltration when degradation is localized; remove and replace only the affected upper layer when the lower profile remains serviceable |
Full media or cartridge replacement | Media broadly darkened or spent, repeated bypass, prolonged drawdown, damaged bed, or poor treatment after corrective cleaning | Inspect the full treatment train, underdrain seals, bypass, and structural condition; follow manufacturer requirements | Use when localized work cannot restore hydraulic function or treatment performance |
EPA guidance notes that for perlite media, darkening from white to nearly black indicates exhausted media. [5]
Remove Sediment from Pretreatment Zones and Filter Areas
Measure sediment at several points with a marked rod or depth gauge, and log each reading on its own. Keep sediment depth separate from media depth in your records. That one detail matters, because mixing them up can lead crews to remove treatment media by mistake.
Use the approved O&M threshold for the site. Minnesota guidance sets a common limit at half the chamber depth to the outlet or 18 inches, whichever is less. [1] For filter beds, Minnesota guidance says to remove sediment when buildup goes past 1 inch. [1]
Before removing material, isolate or bypass inflow. Then use vacuum equipment or controlled hand tools. Be careful with exposed liners - dragging hoses or heavy gear across them can turn a routine cleanout into a repair job. If underdrain piping, geotextile, or structural damage becomes visible, stop work at once.
Dispose of Residuals Correctly
Sediment from stormwater filters may contain petroleum, metals, and other pollutants. Separate oily or visibly contaminated material from cleaner sediment as soon as it is removed. When rules require it, characterize the waste and send it only to a disposal or recycling facility allowed to accept that material.
Location | Inspection Indicator | Maintenance Action | Documentation Requirement |
|---|---|---|---|
Sediment chamber cleanout | Sediment reaches the approved depth or volume limit; storage or drawdown is reduced | Vacuum or remove sediment without damaging outlet structures; inspect chamber floor and walls | Record measured depth, estimated volume removed, equipment used, waste profile, disposal facility, and post-cleanout condition |
Filter-bed sediment removal | Surface sediment exceeds the system criterion, crusting develops, or ponding persists beyond the design drawdown time | Skim, rake, or remove the affected layer only as authorized; replace media where required | Record area and depth removed, replacement media specification and quantity, photographs, and post-maintenance drawdown result |
Cartridge cleanout | Sediment or debris accumulates around cartridges or bay floors; flow restriction or bypass occurs | Remove sediment and debris with approved equipment; inspect cartridges and seals; replace damaged elements | Record cartridge condition, sediment depth, cleaning or replacement performed, parts used, and flow verification |
Pretreatment maintenance | Trash, floatables, oil, or sediment reduces available pretreatment storage or threatens the filter | Remove and segregate residuals; clean inlet screens, forebays, sumps, or separators; repair damaged components | Record material type, quantity, contamination observations, containment method, characterization results when applicable, transporter, and destination |
After each cleanout, check that the filter drains within the applicable design drawdown time. Then inspect it again after the next significant storm. That follow-up check helps confirm that infiltration has been restored and that the work did not create preferential flow paths. If drain-down is still slow after cleanout, move to repair-level diagnostics. If cleaning does not restore drain-down, continue to component repair checks.
Repair Components When Performance Triggers Appear
When cleaning stops fixing drawdown, the job shifts from routine maintenance to repair diagnosis. If performance does not come back after cleaning, find the root cause first, then decide whether repair or replacement makes more sense. The goal is simple: move from symptom to corrective action.
A practical sequence is observe → protect and stabilize → diagnose the flow path → repair or replace → verify performance → document and revise triggers. If cleanout fails, repair the flow path or the structure before the filter goes back into service. Record every step before reopening the system.
Address Structural Defects and Blocked Drainage Paths
Trace the full flow path from end to end: inlet, pretreatment, media, underdrain, outlet, overflow, and bypass. A blockage downstream can look just like media failure if you stop the check too early. Prompt action is needed for leaks, damaged access covers, deteriorated concrete, broken seals, failed hinges, corroded hardware, and damaged inlet or outlet structures. Any defect that could let untreated runoff bypass the filter, put the public at risk, or weaken a vault should be treated as urgent, and access should stay restricted until the area is safe. [9]
If ponding continues after cleaning, compare the water level at the filter surface with the level in the underdrain observation well. Surface ponding with no water in the underdrain usually points to a clogged filter layer. Water showing up at both the surface and in the observation well usually points to a blocked underdrain or outlet pipe. Virginia guidance recommends this comparison and separates a blocked pipe that can be flushed from an underdrain that needs replacement when structural damage is present. [11] Don’t pick the fix until the blockage location is confirmed.
Use that diagnosis to target the repair, not the symptom.
Escalate Repeat Ponding, Bypass, and Poor Effluent Indicators
Repeat bypass, unusual odors, discolored media, or declining effluent quality should trigger escalation, not another round of the same work order. Wisconsin guidance notes that high inlet water levels can point to spent or blocked media or membranes, and that sediment buildup in bypass structures creates its own maintenance issues. [10] Fix the root cause before reopening.
Bring in a qualified stormwater professional or engineer when you find structural damage, suspected contamination, confined-space hazards, or repeated treatment failure after corrective work. Filtration guidance also identifies holes, ruts, or other openings in media as possible bypass paths and recommends fixing the underlying cause before replacing the damaged media. [6] Replacing media over a damaged subbase or torn separation fabric just sets up the same failure again.
Verify Repairs and Update the Maintenance Record
A repair is not finished until field verification and written documentation are done. After the work is complete, confirm that covers, hinges, seals, concrete, inlets, outlets, underdrains, flow-control devices, overflow paths, and media or cartridges match the approved configuration. Remove construction debris, then observe or test the system to make sure water follows the intended treatment and discharge path without leakage, obstruction, or early bypass. Take dated photos from the same locations before and after the repair so the restored condition is easy to confirm. [6]
Record the date, site conditions, defect, root cause, work performed, materials used, waste disposition, verification results, and follow-up date. If the repair points to a repeating cause - such as repeated sediment loading, frequent debris buildup, or a second underdrain blockage - update the maintenance plan with a better inspection frequency or cleaning trigger. Use only thresholds set by the permit, design documents, manufacturer instructions, or applicable guidance. [7][8]
Carry the updated record into the next inspection cycle.
Apply Safety Controls and Track Performance Over Time
Follow Field Safety Procedures for Vaults, Sediment, and Public Access Areas
Once cleanouts and repairs become routine, safety controls and steady recordkeeping make the work easier to manage. The goal is simple: crews need to inspect, clean, and fix the system without turning maintenance into a hazard of its own.
Treat every vault or chamber as a confined space until a qualified person evaluates it. Under OSHA’s permit-required confined-space framework, a space must be handled as a permit space when it contains a hazardous atmosphere or another recognized life-safety hazard.[13][16] Start with the simplest question: can the work be done from the surface? If not, and entry is needed, follow the site confined-space permit and entry plan before anyone goes in.
When entry is allowed, test the atmosphere with a calibrated, direct-reading instrument in this order: oxygen first, then combustible gases and vapors, then toxic contaminants such as hydrogen sulfide.[18][19] Test at more than one elevation, since gases can settle in layers, and keep monitoring during the entire entry. Use forced-air ventilation when it can control atmospheric hazards, but don’t treat ventilation as a stand-in for testing or continuous monitoring. Keep dependable voice or radio contact between entrants and the attendant. Each entrant should wear a properly fitted full-body harness and retrieval line unless the employer documents that another option is safer or feasible.[15] A non-entry rescue system should be ready whenever feasible. Workers must leave at once if monitor alarms sound, ventilation stops working, communication is lost, conditions shift, or the entry supervisor orders evacuation.[12]
For surface work, match PPE to the site hazard assessment. Keep sediment off skin and away from food, ban eating or drinking in the work area, and keep a spill kit and hand-washing water on site. Before opening any access point in or near a roadway, prepare a site-specific traffic-control plan that follows the current edition of the Manual on Uniform Traffic Control Devices. Never leave an open vault, removed grate, or excavation unattended. Secure covers and barriers every time the crew steps away.[17][19][20]
Once the crew is protected, record the same field conditions on each visit so you can compare system performance over time.
Track the Data That Show Whether Maintenance Is Working
Field notes only help if they’re recorded the same way each time. Good records shift a program from reactive maintenance to managed maintenance. Create one asset record for each filter and connect it to the location, photos, and related records. At minimum, record the address or coordinates; owner and responsible maintenance organization; system type; drainage area; design flow or treatment capacity; filter dimensions; media type and specification; access points; installation date; inspection and maintenance history; and known site constraints.[2]
Use one inspection form every time so results line up across visits. The table below shows the core fields that connect what crews see in the field to how the system is actually performing:
Data Category | What to Record | Why It Matters |
|---|---|---|
Hydraulic performance | Ponding depth and duration, drawdown time, bypass events | Confirms treatment capacity and flags clogging |
Physical condition | Sediment depth (in inches), media surface, cartridge or screen condition, structural defects | Triggers cleaning, repair, or replacement |
Rainfall context | Inspection date, recent rainfall amount and intensity, antecedent dry period | Makes drawdown comparisons valid across visits |
Operations | Labor hours, materials used, removed volume (cubic yards or gallons), disposal destination | Supports budgeting and disposal compliance |
Verification | Post-maintenance drawdown test result, verification result | Closes the loop on whether the work restored function |
Measure sediment depth with a probe and compare it against the outlet invert or the manufacturer’s maximum allowed level. Don’t estimate it by eye.[14] If a permit requires it, add flow, turbidity, or influent and effluent water-quality measurements to the record.
Conclusion: Use Maintenance Records to Improve Operating Plans
Trend review turns routine inspection logs into maintenance triggers. Review trends at least once a year and after major storms. If drawdown time keeps increasing across inspection cycles, that points to clogging even when sediment depth still falls within allowed limits. That pattern should trigger a media inspection and a post-cleaning drawdown test, not just another repeat of the same work order. If storms keep leaving behind high sediment loads, it may make sense to clean pretreatment units more often even when the filter still appears to be working. This kind of review helps crews act before flooding, bypass, or permit problems show up.
Use inspection, cleaning, repair, verification, and trend review as one operating cycle. Inspect on a set schedule, maintain media before clogging spreads, remove sediment before storage and treatment capacity drop, repair defects when performance triggers appear, and adjust thresholds based on what the trend data shows.
FAQs
How do I know if my stormwater filter needs cleaning or repair?
Use a performance monitoring program that combines automated sensors with regular on-site inspections. Track flow, water quality, and infiltration to make sure the filter is doing the job it was built to do.
Just as important, watch for clear warning signs in the field. Sediment buildup in forebays and inlets, structural damage, and reduced capacity can all signal that the system needs cleaning or immediate repair.
What should be documented after each stormwater filter inspection?
After each stormwater filter inspection, document what you found and what you did. Include:
inspection findings
maintenance completed, such as sediment removal
repairs that are needed or have been finished
any safety issues noted
Also record performance results, such as flow rates and water quality measurements when available. This helps you track whether the filter is still working as designed.
When does stormwater filter maintenance become a safety issue?
Stormwater filter maintenance turns into a safety issue when inspections or repairs are put off and the filter can no longer do its job. That risk shows up fast when sediment builds up or the media gets clogged, slowing flow, blocking it, or pushing the system toward overflow or failure.
A clear safety trigger is any sign that flow control structures or filter capacity are no longer working as intended. For example, heavy sediment buildup that hurts performance needs prompt action rather than waiting for the next check.
Related Blog Posts
Latest Articles
©2025
Narrative Change and Power Building: The Missing Half of Advocacy
Narrative change is the process of disrupting dominant narratives that normalize inequity and advancing new narratives from historically marginalized communities.
Funding Resilience Without Federal Grants
BRIC is unreliable and FEMA is shrinking. Here's how cities fund climate resilience with dedicated revenue, blended finance, and a coordinating authority.
The ESG Blind Spot: How AI Is Finding Risks in Companies Nobody Else Is Watching
Norway's sovereign wealth fund uses AI to screen 7,200 portfolio companies for forced labor and corruption within 24 hours. The real story is the emerging-market coverage gap that traditional ESG data vendors miss — and what it means for any company with a global supply chain.
FAQ
What does it really mean to “redefine profit”?
What makes Council Fire different?
Who does Council Fire work with?
What does working with Council Fire actually look like?
How does Council Fire help organizations turn big goals into action?
How does Council Fire define and measure success?