Sep 3, 2026
Green Infrastructure for Sediment Control
Sustainability Strategy
In This Article
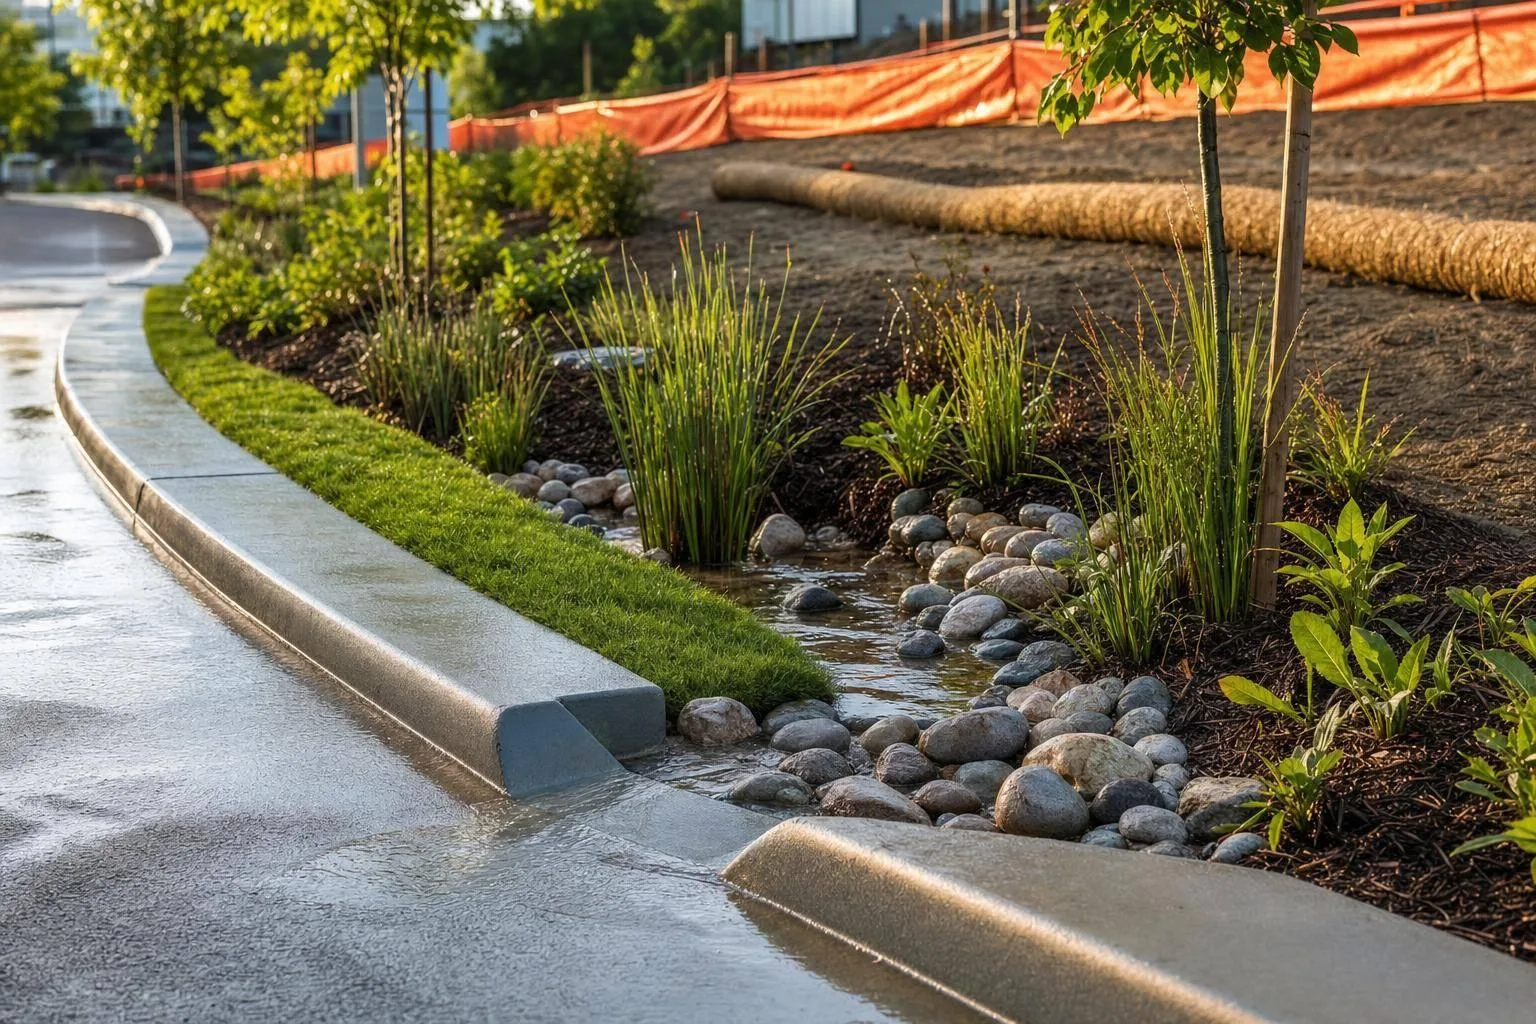
Prioritize temporary controls during construction, then use bioswales, bioretention, and filter strips for long-term TSS reduction.
Green Infrastructure for Sediment Control
If I need one takeaway, it’s this: temporary controls come first, green infrastructure comes later. During active grading, I would rely on silt fences, check dams, and sediment basins/traps to hold back heavy sediment loads. After the site is stabilized, I would shift to bioswales, vegetated filter strips, and rain gardens/bioretention for longer-term runoff treatment.
Here’s the short version:
Bioswales / vegetated swales: often 60%–80% TSS removal, sometimes more than 90% with the right design and upkeep
Vegetated filter strips: about 40%–90% TSS removal, but only when flow stays as sheet flow
Rain gardens / bioretention: often 70%–90% TSS removal for stabilized sites
Silt fences: around 70% TSS removal, but mostly for perimeter sheet flow during construction
Check dams: mainly slow channel flow; they help more with coarser sediment than fine particles
Sediment basins: often 60%–80% sediment removal and handle the biggest construction-stage loads
What drives the choice is simple:
Project phase
Available space
Type and amount of sediment
How much upkeep the site team can handle
My bottom line: I would not treat these as interchangeable. Temporary controls protect the site during earthwork. Green infrastructure takes over after stabilization for long-term sediment and TSS control.
From Runoff to Resilience: Rethinking Stormwater with Green Infrastructure
Quick Comparison
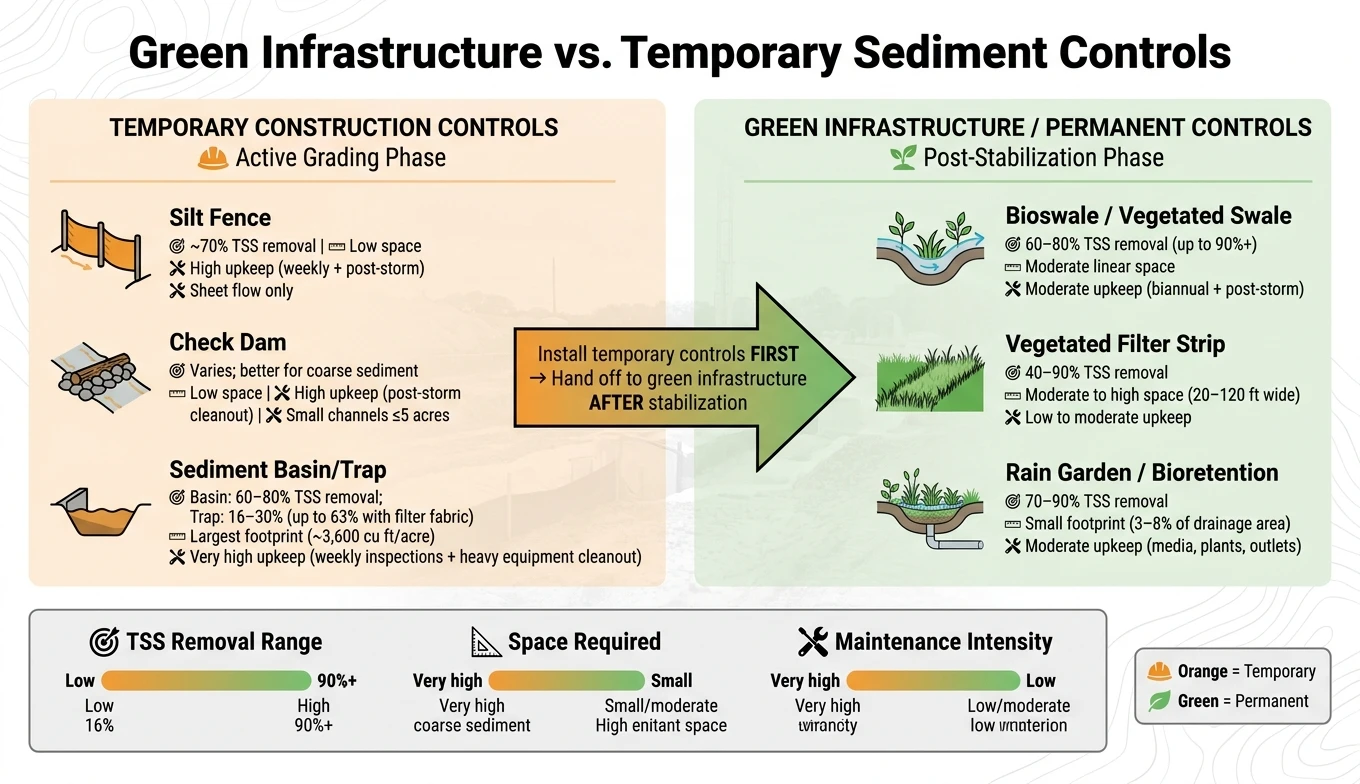
Green Infrastructure vs. Temporary Sediment Controls: Performance, Space & Maintenance
Practice | Best use stage | Main job | Typical sediment/TSS result | Space need | Upkeep |
|---|---|---|---|---|---|
Bioswale / vegetated swale | After stabilization | Slow, filter, and convey runoff | 60%–80%, sometimes higher | Moderate linear space | Moderate |
Vegetated filter strip | After stabilization | Filter sheet flow | 40%–90% | Moderate to high | Low to moderate |
Rain garden / bioretention | After stabilization | Pond, filter, infiltrate | 70%–90% | Low to moderate | Moderate |
Silt fence | Active grading | Perimeter interception | About 70% | Low | High |
Check dam | Active grading | Slow channel flow | Varies; better for coarse sediment | Low | High |
Sediment basin / trap | Early construction to stabilization | Settle bulk sediment | Basin: 60%–80%; trap: often lower | High | Very high |
If I were screening options fast, I’d use sediment basins and perimeter controls early, then bring in planted systems once heavy soil disturbance is over.
1. Bioswales and Vegetated Swales
Bioswales and vegetated swales are shallow, open channels planted with grass, native plants, or other dense vegetation. Their job is simple: slow runoff, let sediment drop out, and filter water as it moves through plants and soil. Bioswales usually include amended media, check dams, and sometimes underdrains. Vegetated swales are more basic, leaning mostly on turf or native grasses over lightly amended or native soil. That difference matters, because performance changes a lot based on design, slope, and upkeep.
Sediment Removal
When these systems are designed well, bioswales and vegetated swales often deliver about 60% to 80% TSS removal. With dense vegetation, pretreatment, and well-kept media, some systems can exceed 90%.[10][11][14] Dry bioswales often do better than wet ones. In one Illinois case study, dry systems reached 70% TSS reduction, while wet systems reached 59%.[6][15]
A lot of the sediment drops out early in the channel. Research suggests that 40% to 50% of TSS can be trapped in the first half of a swale.[13][16] That’s why inlet design matters so much. Pretreatment features, like a sediment forebay, can make a big difference.[9][7]
There’s a catch, though: this level of performance depends on having enough room for a long, narrow channel.
Land Footprint
Bioswales and vegetated swales need a linear corridor to function well. You’ll usually see them along roads, parking lot edges, property lines, or at the toe of a slope.[10][8] They’re a poor fit for tight urban sites where that kind of linear space just isn’t available.
Longitudinal slopes are usually kept low, often around 3% to 5% or less. If the slope gets steeper, check dams can help slow flow and hold the system together.[8][11]
Maintenance Needs
After the vegetation is established, maintenance is fairly routine. Inspections are usually done twice a year and after major storms. Typical work includes mowing, removing debris, reseeding bare spots, and clearing sediment from inflow points, forebays, check dams, and channel bottoms.
Guidance recommends removing sediment when deposits reach about 4 in (101.6 mm) deep or take up about 25% of the swale's original design volume.[12][7][9] If that sediment stays put, performance can drop fast. One study found that runoff effectiveness fell by about 52% over 10 years as sediment built up.[17]
Once the site is stable, that upkeep is usually pretty manageable. During active earthwork, it’s a different story.
Best Project Phase
Bioswales and vegetated swales usually aren’t the main control during heavy earthwork. Construction traffic and grading can tear up new plantings and damage the system before it has a chance to work. A smarter path is to shape the swale early, protect it with temporary controls, and then finish planting and media installation as the project moves into building construction and infrastructure work.[10][11]
After that - especially once construction wraps up - they work well as permanent runoff controls for paved areas, roads, and other stabilized surfaces.[8][10] In plain terms, they perform best once disturbed soil is already stable, not while heavy grading is still in full swing.
They make the most sense where runoff can move through a defined channel; the next practice is a better fit when water spreads out as shallow sheet flow.
2. Vegetated Filter Strips
Where bioswales deal with channeled runoff, vegetated filter strips do a different job. They’re built for shallow, even sheet flow. These strips are gently sloped, densely planted areas - often grass or native herbaceous plants - set downslope from a disturbed or contributing area. As runoff moves slowly across the strip, water speed drops, sediment settles, and flow passes through plant stems, surface litter, and soil before it reaches a drain, stream, or downstream BMP.
Sediment Removal
When the setup is right, performance can be strong. TSS removal often lands in the 40–90% range, and some studies show even higher results.[21] A 2024 review found that a roughly 66-ft-wide strip (20 m) retained 87–100% of TSS in some runoff cases.[18]
Length matters here. Longer strips keep beating shorter ones. A 30-ft strip cut sediment loss by about 91%, while a 15-ft strip still delivered about 81% reduction.[20] Even short strips can help if they’re laid out well. The Minnesota Stormwater Manual notes that about 50% of TSS can settle out within the first 3 ft of a properly designed strip.[19]
There’s a catch, though. This kind of performance depends on runoff arriving as even sheet flow. Once water bunches up into rills or small channels, sediment removal drops fast, and the strip itself can start to break down. On active construction sites with heavy sediment loads and hard storms, filter strips make more sense as a secondary or polishing control rather than the main barrier.
Land Footprint
Filter strips need more horizontal room than structural controls like silt fences. NRCS calls for at least 20 ft of flow length for suspended-solids control, and widths often run from 20 to 120 ft depending on slope and drainage area. Slopes above about 15% should be avoided.
They tend to work best along site edges, at stabilized outfalls, in landscaped setbacks, or in downslope transition areas where runoff can spread out on its own instead of bunching together.
Maintenance Needs
After vegetation takes hold, maintenance is moderate. Most of the work is pretty straightforward:
Mow as needed
Repair bare or eroded spots
Reshape rills if they form
Remove sediment that builds up along the upper edge of the strip
If that sediment buildup is left in place, performance can fall off fast.
During establishment, inspect quarterly and after major storms. After the strip is established, inspect in the spring and fall. It also needs protection from vehicle traffic and material stockpiling, since both can compact the soil and damage the vegetation that makes the strip work.
Best Project Phase
Vegetated filter strips are usually most dependable later in a project, when grading is mostly done and runoff volumes are lower. They fit well as a final treatment along stabilized site boundaries, near finished outfalls, or in post-construction transition areas.
Earlier in the job, the story changes. Heavy sediment loads and concentrated flow can overwhelm the strip before vegetation has time to establish. In that stage, primary controls - silt fences, sediment basins, or check dams - should do the heavy lifting, with filter strips placed downstream to clean up what slips through. Where runoff gets more concentrated or space for storage is tight, rain gardens and bioretention are the next step up in treatment.
3. Rain Gardens and Bioretention
Where filter strips deal with sheet flow, rain gardens and bioretention step in when runoff ponds and carries finer sediment. Both are planted basins that work in much the same way: they hold runoff at the surface, move it through mulch and engineered soil, and then let the water soak in or drain out. The U.S. EPA treats the more complex versions - those built with amended soils and drainage systems - as bioretention.[22][30] In practice, bioretention is the tighter, higher-treatment option among permanent green infrastructure practices, built for stabilized sites where fine-sediment control matters most.
Sediment Removal
For well-designed, well-maintained bioretention systems, TSS removal usually lands in the 70–90% range during typical storms. That’s a strong result, especially when the goal is to catch the fine material that other controls often miss. A 2024 urban rain garden study showed just how low outflow concentrations can get: inflow TSS of 134 mg/L fell to 2 mg/L and 16 mg/L at two separate outflows.[33]
Still, results can swing a lot from one site to another. A review of Hong Kong installations found one rain garden with only a 3% average TSS reduction, while another reached about 60% TSS concentration reduction.[32] That kind of gap makes the point pretty clearly: design, upkeep, and site conditions can make or break performance.
Land Footprint
Rain gardens usually take up less room than sediment basins and are often more compact than swales or filter strips. Many U.S. manuals size bioretention cells at about 3–8% of the contributing impervious drainage area,[23][24] which means they can often fit into places like parking lot islands, building setbacks, or landscaped buffers.
That small footprint makes them a good match for urban and suburban projects where every square foot counts. Even so, siting rules still matter. Most guidance calls for:
10–20 ft of separation from building foundations
At least 2–4 ft of unsaturated soil above the seasonal high groundwater table
Maintenance Needs
During the establishment period, these systems need close attention. Water every 2–3 days for the first 1–2 months, then switch to watering only during drought.[26] After plants are established, inspect after storms and monthly during wet months. Clear inlets and outlets, remove built-up sediment, spread mulch back into place, and replant bare areas as needed.[26]
One warning sign deserves special attention: if water is still ponding for more than 48 hours after a storm, the media may be clogging. When that happens, the top few inches may need to be scraped out and replaced.[26]
Best Project Phase
Rain gardens and bioretention work best post-construction, not as the main control during the construction phase.[28][29] Heavy sediment loads and equipment traffic during earthwork can clog the system and damage plants before they’ve had a chance to take hold. That’s why many U.S. stormwater programs call for delaying installation - or protecting the practice with construction fencing and temporary diversions - until the contributing drainage area is stabilized.
Once pavement, landscaping, and seeded areas are in place, these systems shift into their long-term role. They become the fine-sediment polishing step, picking up particles that slip past upstream controls. A sediment forebay or other pretreatment feature at the inlet is strongly advised because it catches coarser material before it reaches the main cell and helps extend service life.[25][27][31] During active construction, temporary sediment controls still need to handle the bulk of the load.
4. Silt Fences
Silt fences are temporary perimeter barriers made from permeable fabric stretched on posts and set along the downslope edge of disturbed soil. They work only when runoff stays as shallow sheet flow. Their job is to trap sediment by letting runoff pond and settle out behind the fence, not by screening water through the fabric.[37][1][35] Compared with planted practices, silt fences are built for active grading: they’re fast to install, simple to use, and far less durable.
Sediment Removal
When installed the right way, silt fences typically remove about 70% of TSS, though that number falls off quickly when runoff contains mostly fine silts and clays.[35] That drop matters on many construction sites, because the smallest particles are often the hardest to control. Field monitoring has shown TSS dropping from about 3,000 mg/L to 500 mg/L, which works out to roughly 75% removal.[5]
That said, even a silt fence that looks like it’s doing its job may not cut turbidity in a steady way. Fine particles can stay suspended and pass through the fabric.[34][5] If a site has turbidity limits, silt fences should be backed up with upstream erosion control such as mulch, seeding, and other sediment practices.[38][39]
Land Footprint
Silt fences don’t take up much space in plan view, but they still need room uphill for ponding and settling. Guidance often recommends placing them at least 3–5 feet from the toe of slope, where feasible, to give runoff more space to slow down and drop sediment.[1][36]
They should not be installed across channels, ditches, or intermittent streams. Silt fences are meant for shallow sheet flow from small drainage areas. Once runoff becomes concentrated, the fence can overtop, wash out at the base, or fail outright and send trapped sediment downstream.[1][3][36]
Maintenance Needs
This is where silt fences can become a headache. They need frequent attention: inspect them before and after each storm, remove sediment once it reaches about one-third to one-half of the fence height, and fix tears, sagging sections, or undercut areas right away.[1][3][36] The fabric itself has a design life of about six months, so replacement may be needed if the job runs longer.[36] That level of upkeep is a big reason silt fences belong in construction, not in post-construction stormwater control.
Best Project Phase
Silt fences fit the active grading and earthwork phase. Put them in place before grading begins, then remove them after the site is stabilized and sediment cleanup is done.[1][3] On projects with green infrastructure, they also play a protective role by shielding bioswales, rain garden inlets, and bioretention cells from construction sediment before those systems start operating.[1][39]
Used this way, silt fences act as a short-term line of defense while upstream erosion control - mulch, seeding, and soil stabilization - does the heavier lifting of reducing sediment at the source.
Where runoff concentrates in a channel, check dams slow flow more effectively.
5. Check Dams
Check dams are small barriers placed across swales, ditches, or drainage channels to slow runoff, cut channel velocity, and give suspended sediment a chance to settle before water moves farther downslope.[42][45][46][48] Their main purpose is flow control and scour prevention, with sediment capture as a smaller, secondary function.[43] EPA and state stormwater guidance generally classifies them as erosion-control measures, not a replacement for a sediment basin.[4][48] They make the most sense where swales or ditches start carrying concentrated flow.
Sediment Removal
A check dam works by slowing water down first. Sediment removal comes second, and in most cases that means coarser material, not fine particles. Fine silts and clays often stay suspended and pass through the structure.[4][42][44][48] Some state standards set an 80% TSS removal target for rock check dams, but field data is less clear-cut. One transportation study reported about 70% lower TSS after installation, yet similar drops can also happen in vegetated swales without check dams.[46][40] That’s why their main value is channel protection and flow reduction, not basin-level sediment treatment.
For better performance, check dams should be used with upstream erosion controls such as mulch, seeding, and soil stabilization, plus downstream sediment basins or traps to catch the finer particles that get through.[4][2][48] A sump excavation placed right upstream of each dam can help as well by adding more storage for trapped sediment.[47]
Land Footprint
One of the big pluses of check dams is that they fit inside existing channels and tight corridors without taking up much extra space. Most design standards limit them to drainage areas of 5 acres or less and a maximum dam height of 2 feet.[46] They perform best in straight channel sections. On sharp bends, flow can get pushed into the banks and cause scour around the dam.[44]
When several check dams are installed in a series, the upstream toe of one dam should line up with the crest of the next. The center of each dam should also sit about 6 inches lower than the shoulders.[44][45][46][47]
Maintenance Needs
Check dams need steady upkeep if they’re going to keep doing their job. Inspect them at least once a week on active sites, every two weeks on inactive sites, and within 24 hours after any rain event of 0.5 inches or more.[45] Sediment should be removed once it reaches about one-third to one-half of the dam height or sump depth.[41][44][45][46][47]
Crews should also fix displaced rock, repair undercut channels, and reseed any disturbed banks as soon as problems show up.[44][46][47]
Best Project Phase
Check dams are a good fit for temporary channels and early-stage stabilization work. In that role, they slow runoff, protect newly seeded swales, and limit scour while permanent drainage is still being built.[45][48] In green infrastructure channels, they can also support infiltration and help new vegetation get established.[42][44][48]
Once the channel is stable and the permanent drainage system is in place, temporary check dams are removed. If the site calls for larger drainage coverage or deeper storage, sediment basins and traps are the better choice.
6. Sediment Basins and Traps
When a site is under active grading and sediment loads spike, sediment basins and sediment traps act as temporary holding areas for construction-stage sediment control. A sediment basin is the larger, engineered impoundment placed at the low point of the site. A sediment trap is the smaller, simpler option used for limited drainage areas. In plain terms, they do during construction what permanent green infrastructure is meant to do later.
Sediment Removal
When they’re designed well and kept in working shape, basins often remove 60% to 80% of sediment, and some monitored basins have done even better.[50][53][62][63][64] The outlet setup plays a big part here. Surface withdrawal and media filters can improve TSS removal by drawing cleaner water from near the top of the basin rather than from the murkier lower zone.[56][49][58]
Many state standards set a minimum target of 80% TSS removal, and some places near sensitive waters call for 85% or more along with sizing for a 10-year, 24-hour storm.[54][57] Traps are a different story. Basic sediment traps usually remove about 16% to 30% of TSS, though layered filter fabric can push that number to about 63%.[55] That range matters most on tight sites where space is scarce and maintenance crews are already stretched thin.
Land Footprint
Sediment basins usually take up the largest single BMP footprint on a construction site. A common rule is about 3,600 cubic feet of storage per acre of drainage area. It’s a simple trade: give up land, gain storage, and get a control measure that can handle loads other practices can’t match.[49][53][60]
Basins need to sit at the lowest point of the disturbed area, but still outside receiving waters, wetlands, and required buffer zones. They also need clear access for heavy equipment so crews can remove built-up sediment without turning the whole area into a mess.[49][53] Sediment traps need less room and fit well at concentrated outfalls, roadside ditches, or slope toes serving catchments of a few acres or less. Even so, they still need enough space for safe entry and cleanout.[51][52]
Maintenance Needs
Maintenance is frequent, hands-on, and hard to ignore. Most guidance calls for:
Weekly inspections during active construction
Daily checks during extended rain
An inspection within 24 hours after any storm that drops 0.5 inches or more of rainfall[65][66]
Sediment should be removed once material builds up to half the design storage depth in basins or about one-third of trap capacity.[49][51][52] On busy projects, that can mean hauling equipment back in again and again over the course of a single season.
Best Project Phase
Sediment basins and traps go in early, usually right after perimeter controls are installed, and they stay in service until 80% or more of the drainage area has been stabilized.[50][59][61] After that, basins may be decommissioned or turned into permanent detention ponds or bioretention facilities, depending on the post-construction stormwater plan.[50][53]
Planning for that conversion early can save time and cut down on rework. It also helps connect short-term construction controls with the site’s long-term stormwater layout. Their storage demand, land take, and upkeep set up the contrast for the comparison that follows.
Performance, Space, and Upkeep: A Direct Comparison
These practices fall into two clear groups: permanent green infrastructure and temporary construction controls. They don’t compete so much as they work one after the other. During active construction, the job is to keep sediment from moving off-site. After the site settles down, the focus shifts to treating runoff with planted systems that can handle finer material over time.
That’s why the main question isn’t which option wins on its own. It’s which one fits the site layout, the sediment load, and the stage of the project. This comparison stays focused on three things: sediment performance, space needs, and upkeep.
Sediment Removal and TSS Reduction
Performance changes based on both the practice and the size of the sediment. Temporary construction controls - sediment basins, silt fences, and check dams - do their best work during active grading, where they catch coarser sediment before it travels farther downstream.
Green infrastructure plays a different role. Once the site is stabilized, practices like bioretention and bioswales tend to do a better job with fine suspended solids. In plain terms, they’re better suited for the smaller particles that stay in the water column longer. Vegetated filter strips can help, but on fine-particle removal they tend to lag behind bioretention and bioswales after vegetation is in place.
Land Footprint and Siting Limits
Space can make the choice for you before performance even enters the picture. Silt fences and check dams take the least room. They sit along a perimeter or inside an existing channel, and they don’t need excavation.
Vegetated filter strips and bioswales need a moderate amount of linear or side space, so they work best where the site plan leaves some breathing room.
Sediment basins need the most land of any practice in this group. On many construction sites, they claim the biggest single BMP footprint because design rules call for a large settling area. If land is tight, that can become a major constraint fast.
Inspection and Maintenance Workload
Upkeep is where the split between short-term and long-term controls becomes hard to ignore.
Temporary controls need frequent, storm-driven attention during active construction. A heavy rain can fill, clog, or damage them in a hurry, so inspections and cleanout can’t wait.
Green infrastructure is less urgent day to day, but it still needs steady care over a much longer life. That usually means:
routine inspections
vegetation management
periodic inlet clearing
Temporary controls demand frequent cleanout. Green infrastructure needs ongoing care that is less urgent but more spread out over time. It’s the difference between emergency-style field work and regular landscape maintenance.
Best Use by Project Phase
The table below turns that comparison into a direct side-by-side summary.
Practice | Best Phase | Primary Role | Maintenance Intensity |
|---|---|---|---|
Silt fence | Active grading | Perimeter sediment interception | High (weekly + post-storm) |
Check dam | Active grading | Channel velocity reduction | High (post-storm cleanout) |
Sediment basin/trap | Early construction through stabilization | Bulk sediment settling | Very high (frequent cleanout) |
Vegetated filter strip | Post-stabilization | Sheet flow filtration, TSS reduction | Low to moderate |
Bioswale | Post-stabilization | Conveyance + TSS treatment | Moderate (vegetation + inlet care) |
Rain garden/bioretention | Post-stabilization | Infiltration + fine sediment removal | Moderate (media, plants, outlets) |
The phase sequence is simple: install temporary controls first, then bring in green infrastructure once major earthmoving is finished. That order matters because each practice is built for a different moment in the life of the site.
Pros, Cons, and Best Fit by Practice
No single practice works everywhere. The right pick depends on three plain questions: What phase is the site in? How much room is there? How much sediment is moving? That’s the lens that matters. A control that works well after stabilization can fail fast during active grading, and a practice that looks good on paper may be the wrong call if the site is tight or the sediment load is high.
This section turns the earlier side-by-side review into a short selection guide. It shows where each practice earns its keep, where it runs into trouble, and when it makes sense to put it on site.
The table below is the fastest way to screen the options.
Practice | Pros | Cons | Best Fit Scenario |
|---|---|---|---|
Bioswale / vegetated swale | Conveyance + treatment; integrates into rights-of-way | Needs linear space; clogs under heavy sediment loads | Post-stabilization; roadside and parking lot corridors |
Vegetated filter strip | High sediment trapping in sheet flow; doubles as buffer | Fails when flow concentrates; upslope edge prone to clogging | Post-stabilization; toe of slopes, field edges, parking lot margins |
Rain garden / bioretention | Small footprint; handles fine particles well | Higher capital cost; media clogs under construction loads | Post-construction; infill sites, rooftop and pavement runoff |
Silt fence | Fast perimeter control | High inspection burden; sheet flow only | Active grading; site perimeter control |
Check dam | Reduces channel velocity in small drainage ways | Requires frequent cleanout; not for large areas | Active grading; small temporary channels and swales |
Sediment basin / trap | High capacity; centralized control; simplifies cleanout | Large footprint; cleanout requires heavy equipment and disposal capacity | Early construction through stabilization; large disturbed catchments |
A quick read of the table shows a simple pattern. Vegetated practices tend to do their best after the site has calmed down and sediment loads drop. Temporary sediment controls do the heavy lifting earlier, when soil is exposed and runoff is dirtier. That distinction saves time, money, and a lot of field headaches.
Conclusion
Timing is the whole story here. Temporary controls do the heavy lifting during active construction. Green infrastructure tends to work best after the site is stable. So the comparison is less about picking one “best” option and more about matching the right tool to the right phase, the site footprint, and the upkeep it will need.
The evidence shows that these practices can deliver strong long-term sediment control when they’re designed well and maintained over time. But performance by itself doesn’t settle the choice. Fit depends on available space, maintenance capacity, and whether the job is short-term sediment capture or long-term water quality improvement.
That’s why planning matters early. Set up construction controls before ground is broken, then shield permanent green infrastructure until the drainage area is stabilized. During construction, permanent systems need protection from compaction and sediment loading so their later performance doesn’t take a hit. The aim isn’t to put one category above the other. It’s to use them in the right order.
Strong sediment control programs sequence temporary controls first, then hand off to permanent green infrastructure after stabilization.
FAQs
When should green infrastructure replace temporary sediment controls?
Green infrastructure should not fully replace temporary sediment controls during construction. It works best as part of a hybrid system.
Temporary controls deliver immediate, short-term protection during active construction. Green infrastructure plays a different role: it supports long-term stormwater management, handles frequent small-to-moderate storm events, and eases pressure on conventional systems.
Which option works best for fine versus coarse sediment?
The available research does not clearly separate which green infrastructure tools perform best for fine sediment versus coarse sediment.
What the evidence does show is more general. Bioswales, swales, and constructed wetlands tend to filter pollutants and suspended solids, and constructed wetlands can remove 80–90% of suspended solids.
How much maintenance do these sediment control practices really need?
Green infrastructure practices like bioswales, vegetated strips, and rain gardens are not maintenance-free. They need steady upkeep to keep working as intended. That means managing vegetation, clearing sediment from inlets or forebays, and checking flow-control structures on a regular basis.
This part often gets brushed aside during planning, and that’s a mistake. Maintenance should be treated as a fixed budget item, not an afterthought. In most cases, ongoing maintenance runs about 5–10% of installation cost per year, compared with 1–3% for gray systems.
Related Blog Posts
Latest Articles
©2026

Narrative Change and Power Building: The Missing Half of Advocacy
Narrative change is the process of disrupting dominant narratives that normalize inequity and advancing new narratives from historically marginalized communities.
Funding Resilience Without Federal Grants
BRIC is unreliable and FEMA is shrinking. Here's how cities fund climate resilience with dedicated revenue, blended finance, and a coordinating authority.

The ESG Blind Spot: How AI Is Finding Risks in Companies Nobody Else Is Watching
Norway's sovereign wealth fund uses AI to screen 7,200 portfolio companies for forced labor and corruption within 24 hours. The real story is the emerging-market coverage gap that traditional ESG data vendors miss — and what it means for any company with a global supply chain.
Narrative Change and Power Building: The Missing Half of Advocacy
Narrative change is the process of disrupting dominant narratives that normalize inequity and advancing new narratives from historically marginalized communities.
Funding Resilience Without Federal Grants
BRIC is unreliable and FEMA is shrinking. Here's how cities fund climate resilience with dedicated revenue, blended finance, and a coordinating authority.
The ESG Blind Spot: How AI Is Finding Risks in Companies Nobody Else Is Watching
Norway's sovereign wealth fund uses AI to screen 7,200 portfolio companies for forced labor and corruption within 24 hours. The real story is the emerging-market coverage gap that traditional ESG data vendors miss — and what it means for any company with a global supply chain.
FAQ
01
What does it really mean to “redefine profit”?
02
What makes Council Fire different?
03
Who does Council Fire work with?
04
What does working with Council Fire actually look like?
05
How does Council Fire help organizations turn big goals into action?
06
How does Council Fire define and measure success?
07
How does technology fit into Council Fire’s work?
Sep 3, 2026
Green Infrastructure for Sediment Control
Sustainability Strategy
In This Article
Prioritize temporary controls during construction, then use bioswales, bioretention, and filter strips for long-term TSS reduction.
Green Infrastructure for Sediment Control
If I need one takeaway, it’s this: temporary controls come first, green infrastructure comes later. During active grading, I would rely on silt fences, check dams, and sediment basins/traps to hold back heavy sediment loads. After the site is stabilized, I would shift to bioswales, vegetated filter strips, and rain gardens/bioretention for longer-term runoff treatment.
Here’s the short version:
Bioswales / vegetated swales: often 60%–80% TSS removal, sometimes more than 90% with the right design and upkeep
Vegetated filter strips: about 40%–90% TSS removal, but only when flow stays as sheet flow
Rain gardens / bioretention: often 70%–90% TSS removal for stabilized sites
Silt fences: around 70% TSS removal, but mostly for perimeter sheet flow during construction
Check dams: mainly slow channel flow; they help more with coarser sediment than fine particles
Sediment basins: often 60%–80% sediment removal and handle the biggest construction-stage loads
What drives the choice is simple:
Project phase
Available space
Type and amount of sediment
How much upkeep the site team can handle
My bottom line: I would not treat these as interchangeable. Temporary controls protect the site during earthwork. Green infrastructure takes over after stabilization for long-term sediment and TSS control.
From Runoff to Resilience: Rethinking Stormwater with Green Infrastructure
Quick Comparison
Green Infrastructure vs. Temporary Sediment Controls: Performance, Space & Maintenance
Practice | Best use stage | Main job | Typical sediment/TSS result | Space need | Upkeep |
|---|---|---|---|---|---|
Bioswale / vegetated swale | After stabilization | Slow, filter, and convey runoff | 60%–80%, sometimes higher | Moderate linear space | Moderate |
Vegetated filter strip | After stabilization | Filter sheet flow | 40%–90% | Moderate to high | Low to moderate |
Rain garden / bioretention | After stabilization | Pond, filter, infiltrate | 70%–90% | Low to moderate | Moderate |
Silt fence | Active grading | Perimeter interception | About 70% | Low | High |
Check dam | Active grading | Slow channel flow | Varies; better for coarse sediment | Low | High |
Sediment basin / trap | Early construction to stabilization | Settle bulk sediment | Basin: 60%–80%; trap: often lower | High | Very high |
If I were screening options fast, I’d use sediment basins and perimeter controls early, then bring in planted systems once heavy soil disturbance is over.
1. Bioswales and Vegetated Swales
Bioswales and vegetated swales are shallow, open channels planted with grass, native plants, or other dense vegetation. Their job is simple: slow runoff, let sediment drop out, and filter water as it moves through plants and soil. Bioswales usually include amended media, check dams, and sometimes underdrains. Vegetated swales are more basic, leaning mostly on turf or native grasses over lightly amended or native soil. That difference matters, because performance changes a lot based on design, slope, and upkeep.
Sediment Removal
When these systems are designed well, bioswales and vegetated swales often deliver about 60% to 80% TSS removal. With dense vegetation, pretreatment, and well-kept media, some systems can exceed 90%.[10][11][14] Dry bioswales often do better than wet ones. In one Illinois case study, dry systems reached 70% TSS reduction, while wet systems reached 59%.[6][15]
A lot of the sediment drops out early in the channel. Research suggests that 40% to 50% of TSS can be trapped in the first half of a swale.[13][16] That’s why inlet design matters so much. Pretreatment features, like a sediment forebay, can make a big difference.[9][7]
There’s a catch, though: this level of performance depends on having enough room for a long, narrow channel.
Land Footprint
Bioswales and vegetated swales need a linear corridor to function well. You’ll usually see them along roads, parking lot edges, property lines, or at the toe of a slope.[10][8] They’re a poor fit for tight urban sites where that kind of linear space just isn’t available.
Longitudinal slopes are usually kept low, often around 3% to 5% or less. If the slope gets steeper, check dams can help slow flow and hold the system together.[8][11]
Maintenance Needs
After the vegetation is established, maintenance is fairly routine. Inspections are usually done twice a year and after major storms. Typical work includes mowing, removing debris, reseeding bare spots, and clearing sediment from inflow points, forebays, check dams, and channel bottoms.
Guidance recommends removing sediment when deposits reach about 4 in (101.6 mm) deep or take up about 25% of the swale's original design volume.[12][7][9] If that sediment stays put, performance can drop fast. One study found that runoff effectiveness fell by about 52% over 10 years as sediment built up.[17]
Once the site is stable, that upkeep is usually pretty manageable. During active earthwork, it’s a different story.
Best Project Phase
Bioswales and vegetated swales usually aren’t the main control during heavy earthwork. Construction traffic and grading can tear up new plantings and damage the system before it has a chance to work. A smarter path is to shape the swale early, protect it with temporary controls, and then finish planting and media installation as the project moves into building construction and infrastructure work.[10][11]
After that - especially once construction wraps up - they work well as permanent runoff controls for paved areas, roads, and other stabilized surfaces.[8][10] In plain terms, they perform best once disturbed soil is already stable, not while heavy grading is still in full swing.
They make the most sense where runoff can move through a defined channel; the next practice is a better fit when water spreads out as shallow sheet flow.
2. Vegetated Filter Strips
Where bioswales deal with channeled runoff, vegetated filter strips do a different job. They’re built for shallow, even sheet flow. These strips are gently sloped, densely planted areas - often grass or native herbaceous plants - set downslope from a disturbed or contributing area. As runoff moves slowly across the strip, water speed drops, sediment settles, and flow passes through plant stems, surface litter, and soil before it reaches a drain, stream, or downstream BMP.
Sediment Removal
When the setup is right, performance can be strong. TSS removal often lands in the 40–90% range, and some studies show even higher results.[21] A 2024 review found that a roughly 66-ft-wide strip (20 m) retained 87–100% of TSS in some runoff cases.[18]
Length matters here. Longer strips keep beating shorter ones. A 30-ft strip cut sediment loss by about 91%, while a 15-ft strip still delivered about 81% reduction.[20] Even short strips can help if they’re laid out well. The Minnesota Stormwater Manual notes that about 50% of TSS can settle out within the first 3 ft of a properly designed strip.[19]
There’s a catch, though. This kind of performance depends on runoff arriving as even sheet flow. Once water bunches up into rills or small channels, sediment removal drops fast, and the strip itself can start to break down. On active construction sites with heavy sediment loads and hard storms, filter strips make more sense as a secondary or polishing control rather than the main barrier.
Land Footprint
Filter strips need more horizontal room than structural controls like silt fences. NRCS calls for at least 20 ft of flow length for suspended-solids control, and widths often run from 20 to 120 ft depending on slope and drainage area. Slopes above about 15% should be avoided.
They tend to work best along site edges, at stabilized outfalls, in landscaped setbacks, or in downslope transition areas where runoff can spread out on its own instead of bunching together.
Maintenance Needs
After vegetation takes hold, maintenance is moderate. Most of the work is pretty straightforward:
Mow as needed
Repair bare or eroded spots
Reshape rills if they form
Remove sediment that builds up along the upper edge of the strip
If that sediment buildup is left in place, performance can fall off fast.
During establishment, inspect quarterly and after major storms. After the strip is established, inspect in the spring and fall. It also needs protection from vehicle traffic and material stockpiling, since both can compact the soil and damage the vegetation that makes the strip work.
Best Project Phase
Vegetated filter strips are usually most dependable later in a project, when grading is mostly done and runoff volumes are lower. They fit well as a final treatment along stabilized site boundaries, near finished outfalls, or in post-construction transition areas.
Earlier in the job, the story changes. Heavy sediment loads and concentrated flow can overwhelm the strip before vegetation has time to establish. In that stage, primary controls - silt fences, sediment basins, or check dams - should do the heavy lifting, with filter strips placed downstream to clean up what slips through. Where runoff gets more concentrated or space for storage is tight, rain gardens and bioretention are the next step up in treatment.
3. Rain Gardens and Bioretention
Where filter strips deal with sheet flow, rain gardens and bioretention step in when runoff ponds and carries finer sediment. Both are planted basins that work in much the same way: they hold runoff at the surface, move it through mulch and engineered soil, and then let the water soak in or drain out. The U.S. EPA treats the more complex versions - those built with amended soils and drainage systems - as bioretention.[22][30] In practice, bioretention is the tighter, higher-treatment option among permanent green infrastructure practices, built for stabilized sites where fine-sediment control matters most.
Sediment Removal
For well-designed, well-maintained bioretention systems, TSS removal usually lands in the 70–90% range during typical storms. That’s a strong result, especially when the goal is to catch the fine material that other controls often miss. A 2024 urban rain garden study showed just how low outflow concentrations can get: inflow TSS of 134 mg/L fell to 2 mg/L and 16 mg/L at two separate outflows.[33]
Still, results can swing a lot from one site to another. A review of Hong Kong installations found one rain garden with only a 3% average TSS reduction, while another reached about 60% TSS concentration reduction.[32] That kind of gap makes the point pretty clearly: design, upkeep, and site conditions can make or break performance.
Land Footprint
Rain gardens usually take up less room than sediment basins and are often more compact than swales or filter strips. Many U.S. manuals size bioretention cells at about 3–8% of the contributing impervious drainage area,[23][24] which means they can often fit into places like parking lot islands, building setbacks, or landscaped buffers.
That small footprint makes them a good match for urban and suburban projects where every square foot counts. Even so, siting rules still matter. Most guidance calls for:
10–20 ft of separation from building foundations
At least 2–4 ft of unsaturated soil above the seasonal high groundwater table
Maintenance Needs
During the establishment period, these systems need close attention. Water every 2–3 days for the first 1–2 months, then switch to watering only during drought.[26] After plants are established, inspect after storms and monthly during wet months. Clear inlets and outlets, remove built-up sediment, spread mulch back into place, and replant bare areas as needed.[26]
One warning sign deserves special attention: if water is still ponding for more than 48 hours after a storm, the media may be clogging. When that happens, the top few inches may need to be scraped out and replaced.[26]
Best Project Phase
Rain gardens and bioretention work best post-construction, not as the main control during the construction phase.[28][29] Heavy sediment loads and equipment traffic during earthwork can clog the system and damage plants before they’ve had a chance to take hold. That’s why many U.S. stormwater programs call for delaying installation - or protecting the practice with construction fencing and temporary diversions - until the contributing drainage area is stabilized.
Once pavement, landscaping, and seeded areas are in place, these systems shift into their long-term role. They become the fine-sediment polishing step, picking up particles that slip past upstream controls. A sediment forebay or other pretreatment feature at the inlet is strongly advised because it catches coarser material before it reaches the main cell and helps extend service life.[25][27][31] During active construction, temporary sediment controls still need to handle the bulk of the load.
4. Silt Fences
Silt fences are temporary perimeter barriers made from permeable fabric stretched on posts and set along the downslope edge of disturbed soil. They work only when runoff stays as shallow sheet flow. Their job is to trap sediment by letting runoff pond and settle out behind the fence, not by screening water through the fabric.[37][1][35] Compared with planted practices, silt fences are built for active grading: they’re fast to install, simple to use, and far less durable.
Sediment Removal
When installed the right way, silt fences typically remove about 70% of TSS, though that number falls off quickly when runoff contains mostly fine silts and clays.[35] That drop matters on many construction sites, because the smallest particles are often the hardest to control. Field monitoring has shown TSS dropping from about 3,000 mg/L to 500 mg/L, which works out to roughly 75% removal.[5]
That said, even a silt fence that looks like it’s doing its job may not cut turbidity in a steady way. Fine particles can stay suspended and pass through the fabric.[34][5] If a site has turbidity limits, silt fences should be backed up with upstream erosion control such as mulch, seeding, and other sediment practices.[38][39]
Land Footprint
Silt fences don’t take up much space in plan view, but they still need room uphill for ponding and settling. Guidance often recommends placing them at least 3–5 feet from the toe of slope, where feasible, to give runoff more space to slow down and drop sediment.[1][36]
They should not be installed across channels, ditches, or intermittent streams. Silt fences are meant for shallow sheet flow from small drainage areas. Once runoff becomes concentrated, the fence can overtop, wash out at the base, or fail outright and send trapped sediment downstream.[1][3][36]
Maintenance Needs
This is where silt fences can become a headache. They need frequent attention: inspect them before and after each storm, remove sediment once it reaches about one-third to one-half of the fence height, and fix tears, sagging sections, or undercut areas right away.[1][3][36] The fabric itself has a design life of about six months, so replacement may be needed if the job runs longer.[36] That level of upkeep is a big reason silt fences belong in construction, not in post-construction stormwater control.
Best Project Phase
Silt fences fit the active grading and earthwork phase. Put them in place before grading begins, then remove them after the site is stabilized and sediment cleanup is done.[1][3] On projects with green infrastructure, they also play a protective role by shielding bioswales, rain garden inlets, and bioretention cells from construction sediment before those systems start operating.[1][39]
Used this way, silt fences act as a short-term line of defense while upstream erosion control - mulch, seeding, and soil stabilization - does the heavier lifting of reducing sediment at the source.
Where runoff concentrates in a channel, check dams slow flow more effectively.
5. Check Dams
Check dams are small barriers placed across swales, ditches, or drainage channels to slow runoff, cut channel velocity, and give suspended sediment a chance to settle before water moves farther downslope.[42][45][46][48] Their main purpose is flow control and scour prevention, with sediment capture as a smaller, secondary function.[43] EPA and state stormwater guidance generally classifies them as erosion-control measures, not a replacement for a sediment basin.[4][48] They make the most sense where swales or ditches start carrying concentrated flow.
Sediment Removal
A check dam works by slowing water down first. Sediment removal comes second, and in most cases that means coarser material, not fine particles. Fine silts and clays often stay suspended and pass through the structure.[4][42][44][48] Some state standards set an 80% TSS removal target for rock check dams, but field data is less clear-cut. One transportation study reported about 70% lower TSS after installation, yet similar drops can also happen in vegetated swales without check dams.[46][40] That’s why their main value is channel protection and flow reduction, not basin-level sediment treatment.
For better performance, check dams should be used with upstream erosion controls such as mulch, seeding, and soil stabilization, plus downstream sediment basins or traps to catch the finer particles that get through.[4][2][48] A sump excavation placed right upstream of each dam can help as well by adding more storage for trapped sediment.[47]
Land Footprint
One of the big pluses of check dams is that they fit inside existing channels and tight corridors without taking up much extra space. Most design standards limit them to drainage areas of 5 acres or less and a maximum dam height of 2 feet.[46] They perform best in straight channel sections. On sharp bends, flow can get pushed into the banks and cause scour around the dam.[44]
When several check dams are installed in a series, the upstream toe of one dam should line up with the crest of the next. The center of each dam should also sit about 6 inches lower than the shoulders.[44][45][46][47]
Maintenance Needs
Check dams need steady upkeep if they’re going to keep doing their job. Inspect them at least once a week on active sites, every two weeks on inactive sites, and within 24 hours after any rain event of 0.5 inches or more.[45] Sediment should be removed once it reaches about one-third to one-half of the dam height or sump depth.[41][44][45][46][47]
Crews should also fix displaced rock, repair undercut channels, and reseed any disturbed banks as soon as problems show up.[44][46][47]
Best Project Phase
Check dams are a good fit for temporary channels and early-stage stabilization work. In that role, they slow runoff, protect newly seeded swales, and limit scour while permanent drainage is still being built.[45][48] In green infrastructure channels, they can also support infiltration and help new vegetation get established.[42][44][48]
Once the channel is stable and the permanent drainage system is in place, temporary check dams are removed. If the site calls for larger drainage coverage or deeper storage, sediment basins and traps are the better choice.
6. Sediment Basins and Traps
When a site is under active grading and sediment loads spike, sediment basins and sediment traps act as temporary holding areas for construction-stage sediment control. A sediment basin is the larger, engineered impoundment placed at the low point of the site. A sediment trap is the smaller, simpler option used for limited drainage areas. In plain terms, they do during construction what permanent green infrastructure is meant to do later.
Sediment Removal
When they’re designed well and kept in working shape, basins often remove 60% to 80% of sediment, and some monitored basins have done even better.[50][53][62][63][64] The outlet setup plays a big part here. Surface withdrawal and media filters can improve TSS removal by drawing cleaner water from near the top of the basin rather than from the murkier lower zone.[56][49][58]
Many state standards set a minimum target of 80% TSS removal, and some places near sensitive waters call for 85% or more along with sizing for a 10-year, 24-hour storm.[54][57] Traps are a different story. Basic sediment traps usually remove about 16% to 30% of TSS, though layered filter fabric can push that number to about 63%.[55] That range matters most on tight sites where space is scarce and maintenance crews are already stretched thin.
Land Footprint
Sediment basins usually take up the largest single BMP footprint on a construction site. A common rule is about 3,600 cubic feet of storage per acre of drainage area. It’s a simple trade: give up land, gain storage, and get a control measure that can handle loads other practices can’t match.[49][53][60]
Basins need to sit at the lowest point of the disturbed area, but still outside receiving waters, wetlands, and required buffer zones. They also need clear access for heavy equipment so crews can remove built-up sediment without turning the whole area into a mess.[49][53] Sediment traps need less room and fit well at concentrated outfalls, roadside ditches, or slope toes serving catchments of a few acres or less. Even so, they still need enough space for safe entry and cleanout.[51][52]
Maintenance Needs
Maintenance is frequent, hands-on, and hard to ignore. Most guidance calls for:
Weekly inspections during active construction
Daily checks during extended rain
An inspection within 24 hours after any storm that drops 0.5 inches or more of rainfall[65][66]
Sediment should be removed once material builds up to half the design storage depth in basins or about one-third of trap capacity.[49][51][52] On busy projects, that can mean hauling equipment back in again and again over the course of a single season.
Best Project Phase
Sediment basins and traps go in early, usually right after perimeter controls are installed, and they stay in service until 80% or more of the drainage area has been stabilized.[50][59][61] After that, basins may be decommissioned or turned into permanent detention ponds or bioretention facilities, depending on the post-construction stormwater plan.[50][53]
Planning for that conversion early can save time and cut down on rework. It also helps connect short-term construction controls with the site’s long-term stormwater layout. Their storage demand, land take, and upkeep set up the contrast for the comparison that follows.
Performance, Space, and Upkeep: A Direct Comparison
These practices fall into two clear groups: permanent green infrastructure and temporary construction controls. They don’t compete so much as they work one after the other. During active construction, the job is to keep sediment from moving off-site. After the site settles down, the focus shifts to treating runoff with planted systems that can handle finer material over time.
That’s why the main question isn’t which option wins on its own. It’s which one fits the site layout, the sediment load, and the stage of the project. This comparison stays focused on three things: sediment performance, space needs, and upkeep.
Sediment Removal and TSS Reduction
Performance changes based on both the practice and the size of the sediment. Temporary construction controls - sediment basins, silt fences, and check dams - do their best work during active grading, where they catch coarser sediment before it travels farther downstream.
Green infrastructure plays a different role. Once the site is stabilized, practices like bioretention and bioswales tend to do a better job with fine suspended solids. In plain terms, they’re better suited for the smaller particles that stay in the water column longer. Vegetated filter strips can help, but on fine-particle removal they tend to lag behind bioretention and bioswales after vegetation is in place.
Land Footprint and Siting Limits
Space can make the choice for you before performance even enters the picture. Silt fences and check dams take the least room. They sit along a perimeter or inside an existing channel, and they don’t need excavation.
Vegetated filter strips and bioswales need a moderate amount of linear or side space, so they work best where the site plan leaves some breathing room.
Sediment basins need the most land of any practice in this group. On many construction sites, they claim the biggest single BMP footprint because design rules call for a large settling area. If land is tight, that can become a major constraint fast.
Inspection and Maintenance Workload
Upkeep is where the split between short-term and long-term controls becomes hard to ignore.
Temporary controls need frequent, storm-driven attention during active construction. A heavy rain can fill, clog, or damage them in a hurry, so inspections and cleanout can’t wait.
Green infrastructure is less urgent day to day, but it still needs steady care over a much longer life. That usually means:
routine inspections
vegetation management
periodic inlet clearing
Temporary controls demand frequent cleanout. Green infrastructure needs ongoing care that is less urgent but more spread out over time. It’s the difference between emergency-style field work and regular landscape maintenance.
Best Use by Project Phase
The table below turns that comparison into a direct side-by-side summary.
Practice | Best Phase | Primary Role | Maintenance Intensity |
|---|---|---|---|
Silt fence | Active grading | Perimeter sediment interception | High (weekly + post-storm) |
Check dam | Active grading | Channel velocity reduction | High (post-storm cleanout) |
Sediment basin/trap | Early construction through stabilization | Bulk sediment settling | Very high (frequent cleanout) |
Vegetated filter strip | Post-stabilization | Sheet flow filtration, TSS reduction | Low to moderate |
Bioswale | Post-stabilization | Conveyance + TSS treatment | Moderate (vegetation + inlet care) |
Rain garden/bioretention | Post-stabilization | Infiltration + fine sediment removal | Moderate (media, plants, outlets) |
The phase sequence is simple: install temporary controls first, then bring in green infrastructure once major earthmoving is finished. That order matters because each practice is built for a different moment in the life of the site.
Pros, Cons, and Best Fit by Practice
No single practice works everywhere. The right pick depends on three plain questions: What phase is the site in? How much room is there? How much sediment is moving? That’s the lens that matters. A control that works well after stabilization can fail fast during active grading, and a practice that looks good on paper may be the wrong call if the site is tight or the sediment load is high.
This section turns the earlier side-by-side review into a short selection guide. It shows where each practice earns its keep, where it runs into trouble, and when it makes sense to put it on site.
The table below is the fastest way to screen the options.
Practice | Pros | Cons | Best Fit Scenario |
|---|---|---|---|
Bioswale / vegetated swale | Conveyance + treatment; integrates into rights-of-way | Needs linear space; clogs under heavy sediment loads | Post-stabilization; roadside and parking lot corridors |
Vegetated filter strip | High sediment trapping in sheet flow; doubles as buffer | Fails when flow concentrates; upslope edge prone to clogging | Post-stabilization; toe of slopes, field edges, parking lot margins |
Rain garden / bioretention | Small footprint; handles fine particles well | Higher capital cost; media clogs under construction loads | Post-construction; infill sites, rooftop and pavement runoff |
Silt fence | Fast perimeter control | High inspection burden; sheet flow only | Active grading; site perimeter control |
Check dam | Reduces channel velocity in small drainage ways | Requires frequent cleanout; not for large areas | Active grading; small temporary channels and swales |
Sediment basin / trap | High capacity; centralized control; simplifies cleanout | Large footprint; cleanout requires heavy equipment and disposal capacity | Early construction through stabilization; large disturbed catchments |
A quick read of the table shows a simple pattern. Vegetated practices tend to do their best after the site has calmed down and sediment loads drop. Temporary sediment controls do the heavy lifting earlier, when soil is exposed and runoff is dirtier. That distinction saves time, money, and a lot of field headaches.
Conclusion
Timing is the whole story here. Temporary controls do the heavy lifting during active construction. Green infrastructure tends to work best after the site is stable. So the comparison is less about picking one “best” option and more about matching the right tool to the right phase, the site footprint, and the upkeep it will need.
The evidence shows that these practices can deliver strong long-term sediment control when they’re designed well and maintained over time. But performance by itself doesn’t settle the choice. Fit depends on available space, maintenance capacity, and whether the job is short-term sediment capture or long-term water quality improvement.
That’s why planning matters early. Set up construction controls before ground is broken, then shield permanent green infrastructure until the drainage area is stabilized. During construction, permanent systems need protection from compaction and sediment loading so their later performance doesn’t take a hit. The aim isn’t to put one category above the other. It’s to use them in the right order.
Strong sediment control programs sequence temporary controls first, then hand off to permanent green infrastructure after stabilization.
FAQs
When should green infrastructure replace temporary sediment controls?
Green infrastructure should not fully replace temporary sediment controls during construction. It works best as part of a hybrid system.
Temporary controls deliver immediate, short-term protection during active construction. Green infrastructure plays a different role: it supports long-term stormwater management, handles frequent small-to-moderate storm events, and eases pressure on conventional systems.
Which option works best for fine versus coarse sediment?
The available research does not clearly separate which green infrastructure tools perform best for fine sediment versus coarse sediment.
What the evidence does show is more general. Bioswales, swales, and constructed wetlands tend to filter pollutants and suspended solids, and constructed wetlands can remove 80–90% of suspended solids.
How much maintenance do these sediment control practices really need?
Green infrastructure practices like bioswales, vegetated strips, and rain gardens are not maintenance-free. They need steady upkeep to keep working as intended. That means managing vegetation, clearing sediment from inlets or forebays, and checking flow-control structures on a regular basis.
This part often gets brushed aside during planning, and that’s a mistake. Maintenance should be treated as a fixed budget item, not an afterthought. In most cases, ongoing maintenance runs about 5–10% of installation cost per year, compared with 1–3% for gray systems.
Related Blog Posts
Latest Articles
©2026
Narrative Change and Power Building: The Missing Half of Advocacy
Narrative change is the process of disrupting dominant narratives that normalize inequity and advancing new narratives from historically marginalized communities.
Funding Resilience Without Federal Grants
BRIC is unreliable and FEMA is shrinking. Here's how cities fund climate resilience with dedicated revenue, blended finance, and a coordinating authority.
The ESG Blind Spot: How AI Is Finding Risks in Companies Nobody Else Is Watching
Norway's sovereign wealth fund uses AI to screen 7,200 portfolio companies for forced labor and corruption within 24 hours. The real story is the emerging-market coverage gap that traditional ESG data vendors miss — and what it means for any company with a global supply chain.
FAQ
01
What does it really mean to “redefine profit”?
02
What makes Council Fire different?
03
Who does Council Fire work with?
04
What does working with Council Fire actually look like?
05
How does Council Fire help organizations turn big goals into action?
06
How does Council Fire define and measure success?
07
How does technology fit into Council Fire’s work?
Sep 3, 2026
Green Infrastructure for Sediment Control
Sustainability Strategy
In This Article
Prioritize temporary controls during construction, then use bioswales, bioretention, and filter strips for long-term TSS reduction.
Green Infrastructure for Sediment Control
If I need one takeaway, it’s this: temporary controls come first, green infrastructure comes later. During active grading, I would rely on silt fences, check dams, and sediment basins/traps to hold back heavy sediment loads. After the site is stabilized, I would shift to bioswales, vegetated filter strips, and rain gardens/bioretention for longer-term runoff treatment.
Here’s the short version:
Bioswales / vegetated swales: often 60%–80% TSS removal, sometimes more than 90% with the right design and upkeep
Vegetated filter strips: about 40%–90% TSS removal, but only when flow stays as sheet flow
Rain gardens / bioretention: often 70%–90% TSS removal for stabilized sites
Silt fences: around 70% TSS removal, but mostly for perimeter sheet flow during construction
Check dams: mainly slow channel flow; they help more with coarser sediment than fine particles
Sediment basins: often 60%–80% sediment removal and handle the biggest construction-stage loads
What drives the choice is simple:
Project phase
Available space
Type and amount of sediment
How much upkeep the site team can handle
My bottom line: I would not treat these as interchangeable. Temporary controls protect the site during earthwork. Green infrastructure takes over after stabilization for long-term sediment and TSS control.
From Runoff to Resilience: Rethinking Stormwater with Green Infrastructure
Quick Comparison
Green Infrastructure vs. Temporary Sediment Controls: Performance, Space & Maintenance
Practice | Best use stage | Main job | Typical sediment/TSS result | Space need | Upkeep |
|---|---|---|---|---|---|
Bioswale / vegetated swale | After stabilization | Slow, filter, and convey runoff | 60%–80%, sometimes higher | Moderate linear space | Moderate |
Vegetated filter strip | After stabilization | Filter sheet flow | 40%–90% | Moderate to high | Low to moderate |
Rain garden / bioretention | After stabilization | Pond, filter, infiltrate | 70%–90% | Low to moderate | Moderate |
Silt fence | Active grading | Perimeter interception | About 70% | Low | High |
Check dam | Active grading | Slow channel flow | Varies; better for coarse sediment | Low | High |
Sediment basin / trap | Early construction to stabilization | Settle bulk sediment | Basin: 60%–80%; trap: often lower | High | Very high |
If I were screening options fast, I’d use sediment basins and perimeter controls early, then bring in planted systems once heavy soil disturbance is over.
1. Bioswales and Vegetated Swales
Bioswales and vegetated swales are shallow, open channels planted with grass, native plants, or other dense vegetation. Their job is simple: slow runoff, let sediment drop out, and filter water as it moves through plants and soil. Bioswales usually include amended media, check dams, and sometimes underdrains. Vegetated swales are more basic, leaning mostly on turf or native grasses over lightly amended or native soil. That difference matters, because performance changes a lot based on design, slope, and upkeep.
Sediment Removal
When these systems are designed well, bioswales and vegetated swales often deliver about 60% to 80% TSS removal. With dense vegetation, pretreatment, and well-kept media, some systems can exceed 90%.[10][11][14] Dry bioswales often do better than wet ones. In one Illinois case study, dry systems reached 70% TSS reduction, while wet systems reached 59%.[6][15]
A lot of the sediment drops out early in the channel. Research suggests that 40% to 50% of TSS can be trapped in the first half of a swale.[13][16] That’s why inlet design matters so much. Pretreatment features, like a sediment forebay, can make a big difference.[9][7]
There’s a catch, though: this level of performance depends on having enough room for a long, narrow channel.
Land Footprint
Bioswales and vegetated swales need a linear corridor to function well. You’ll usually see them along roads, parking lot edges, property lines, or at the toe of a slope.[10][8] They’re a poor fit for tight urban sites where that kind of linear space just isn’t available.
Longitudinal slopes are usually kept low, often around 3% to 5% or less. If the slope gets steeper, check dams can help slow flow and hold the system together.[8][11]
Maintenance Needs
After the vegetation is established, maintenance is fairly routine. Inspections are usually done twice a year and after major storms. Typical work includes mowing, removing debris, reseeding bare spots, and clearing sediment from inflow points, forebays, check dams, and channel bottoms.
Guidance recommends removing sediment when deposits reach about 4 in (101.6 mm) deep or take up about 25% of the swale's original design volume.[12][7][9] If that sediment stays put, performance can drop fast. One study found that runoff effectiveness fell by about 52% over 10 years as sediment built up.[17]
Once the site is stable, that upkeep is usually pretty manageable. During active earthwork, it’s a different story.
Best Project Phase
Bioswales and vegetated swales usually aren’t the main control during heavy earthwork. Construction traffic and grading can tear up new plantings and damage the system before it has a chance to work. A smarter path is to shape the swale early, protect it with temporary controls, and then finish planting and media installation as the project moves into building construction and infrastructure work.[10][11]
After that - especially once construction wraps up - they work well as permanent runoff controls for paved areas, roads, and other stabilized surfaces.[8][10] In plain terms, they perform best once disturbed soil is already stable, not while heavy grading is still in full swing.
They make the most sense where runoff can move through a defined channel; the next practice is a better fit when water spreads out as shallow sheet flow.
2. Vegetated Filter Strips
Where bioswales deal with channeled runoff, vegetated filter strips do a different job. They’re built for shallow, even sheet flow. These strips are gently sloped, densely planted areas - often grass or native herbaceous plants - set downslope from a disturbed or contributing area. As runoff moves slowly across the strip, water speed drops, sediment settles, and flow passes through plant stems, surface litter, and soil before it reaches a drain, stream, or downstream BMP.
Sediment Removal
When the setup is right, performance can be strong. TSS removal often lands in the 40–90% range, and some studies show even higher results.[21] A 2024 review found that a roughly 66-ft-wide strip (20 m) retained 87–100% of TSS in some runoff cases.[18]
Length matters here. Longer strips keep beating shorter ones. A 30-ft strip cut sediment loss by about 91%, while a 15-ft strip still delivered about 81% reduction.[20] Even short strips can help if they’re laid out well. The Minnesota Stormwater Manual notes that about 50% of TSS can settle out within the first 3 ft of a properly designed strip.[19]
There’s a catch, though. This kind of performance depends on runoff arriving as even sheet flow. Once water bunches up into rills or small channels, sediment removal drops fast, and the strip itself can start to break down. On active construction sites with heavy sediment loads and hard storms, filter strips make more sense as a secondary or polishing control rather than the main barrier.
Land Footprint
Filter strips need more horizontal room than structural controls like silt fences. NRCS calls for at least 20 ft of flow length for suspended-solids control, and widths often run from 20 to 120 ft depending on slope and drainage area. Slopes above about 15% should be avoided.
They tend to work best along site edges, at stabilized outfalls, in landscaped setbacks, or in downslope transition areas where runoff can spread out on its own instead of bunching together.
Maintenance Needs
After vegetation takes hold, maintenance is moderate. Most of the work is pretty straightforward:
Mow as needed
Repair bare or eroded spots
Reshape rills if they form
Remove sediment that builds up along the upper edge of the strip
If that sediment buildup is left in place, performance can fall off fast.
During establishment, inspect quarterly and after major storms. After the strip is established, inspect in the spring and fall. It also needs protection from vehicle traffic and material stockpiling, since both can compact the soil and damage the vegetation that makes the strip work.
Best Project Phase
Vegetated filter strips are usually most dependable later in a project, when grading is mostly done and runoff volumes are lower. They fit well as a final treatment along stabilized site boundaries, near finished outfalls, or in post-construction transition areas.
Earlier in the job, the story changes. Heavy sediment loads and concentrated flow can overwhelm the strip before vegetation has time to establish. In that stage, primary controls - silt fences, sediment basins, or check dams - should do the heavy lifting, with filter strips placed downstream to clean up what slips through. Where runoff gets more concentrated or space for storage is tight, rain gardens and bioretention are the next step up in treatment.
3. Rain Gardens and Bioretention
Where filter strips deal with sheet flow, rain gardens and bioretention step in when runoff ponds and carries finer sediment. Both are planted basins that work in much the same way: they hold runoff at the surface, move it through mulch and engineered soil, and then let the water soak in or drain out. The U.S. EPA treats the more complex versions - those built with amended soils and drainage systems - as bioretention.[22][30] In practice, bioretention is the tighter, higher-treatment option among permanent green infrastructure practices, built for stabilized sites where fine-sediment control matters most.
Sediment Removal
For well-designed, well-maintained bioretention systems, TSS removal usually lands in the 70–90% range during typical storms. That’s a strong result, especially when the goal is to catch the fine material that other controls often miss. A 2024 urban rain garden study showed just how low outflow concentrations can get: inflow TSS of 134 mg/L fell to 2 mg/L and 16 mg/L at two separate outflows.[33]
Still, results can swing a lot from one site to another. A review of Hong Kong installations found one rain garden with only a 3% average TSS reduction, while another reached about 60% TSS concentration reduction.[32] That kind of gap makes the point pretty clearly: design, upkeep, and site conditions can make or break performance.
Land Footprint
Rain gardens usually take up less room than sediment basins and are often more compact than swales or filter strips. Many U.S. manuals size bioretention cells at about 3–8% of the contributing impervious drainage area,[23][24] which means they can often fit into places like parking lot islands, building setbacks, or landscaped buffers.
That small footprint makes them a good match for urban and suburban projects where every square foot counts. Even so, siting rules still matter. Most guidance calls for:
10–20 ft of separation from building foundations
At least 2–4 ft of unsaturated soil above the seasonal high groundwater table
Maintenance Needs
During the establishment period, these systems need close attention. Water every 2–3 days for the first 1–2 months, then switch to watering only during drought.[26] After plants are established, inspect after storms and monthly during wet months. Clear inlets and outlets, remove built-up sediment, spread mulch back into place, and replant bare areas as needed.[26]
One warning sign deserves special attention: if water is still ponding for more than 48 hours after a storm, the media may be clogging. When that happens, the top few inches may need to be scraped out and replaced.[26]
Best Project Phase
Rain gardens and bioretention work best post-construction, not as the main control during the construction phase.[28][29] Heavy sediment loads and equipment traffic during earthwork can clog the system and damage plants before they’ve had a chance to take hold. That’s why many U.S. stormwater programs call for delaying installation - or protecting the practice with construction fencing and temporary diversions - until the contributing drainage area is stabilized.
Once pavement, landscaping, and seeded areas are in place, these systems shift into their long-term role. They become the fine-sediment polishing step, picking up particles that slip past upstream controls. A sediment forebay or other pretreatment feature at the inlet is strongly advised because it catches coarser material before it reaches the main cell and helps extend service life.[25][27][31] During active construction, temporary sediment controls still need to handle the bulk of the load.
4. Silt Fences
Silt fences are temporary perimeter barriers made from permeable fabric stretched on posts and set along the downslope edge of disturbed soil. They work only when runoff stays as shallow sheet flow. Their job is to trap sediment by letting runoff pond and settle out behind the fence, not by screening water through the fabric.[37][1][35] Compared with planted practices, silt fences are built for active grading: they’re fast to install, simple to use, and far less durable.
Sediment Removal
When installed the right way, silt fences typically remove about 70% of TSS, though that number falls off quickly when runoff contains mostly fine silts and clays.[35] That drop matters on many construction sites, because the smallest particles are often the hardest to control. Field monitoring has shown TSS dropping from about 3,000 mg/L to 500 mg/L, which works out to roughly 75% removal.[5]
That said, even a silt fence that looks like it’s doing its job may not cut turbidity in a steady way. Fine particles can stay suspended and pass through the fabric.[34][5] If a site has turbidity limits, silt fences should be backed up with upstream erosion control such as mulch, seeding, and other sediment practices.[38][39]
Land Footprint
Silt fences don’t take up much space in plan view, but they still need room uphill for ponding and settling. Guidance often recommends placing them at least 3–5 feet from the toe of slope, where feasible, to give runoff more space to slow down and drop sediment.[1][36]
They should not be installed across channels, ditches, or intermittent streams. Silt fences are meant for shallow sheet flow from small drainage areas. Once runoff becomes concentrated, the fence can overtop, wash out at the base, or fail outright and send trapped sediment downstream.[1][3][36]
Maintenance Needs
This is where silt fences can become a headache. They need frequent attention: inspect them before and after each storm, remove sediment once it reaches about one-third to one-half of the fence height, and fix tears, sagging sections, or undercut areas right away.[1][3][36] The fabric itself has a design life of about six months, so replacement may be needed if the job runs longer.[36] That level of upkeep is a big reason silt fences belong in construction, not in post-construction stormwater control.
Best Project Phase
Silt fences fit the active grading and earthwork phase. Put them in place before grading begins, then remove them after the site is stabilized and sediment cleanup is done.[1][3] On projects with green infrastructure, they also play a protective role by shielding bioswales, rain garden inlets, and bioretention cells from construction sediment before those systems start operating.[1][39]
Used this way, silt fences act as a short-term line of defense while upstream erosion control - mulch, seeding, and soil stabilization - does the heavier lifting of reducing sediment at the source.
Where runoff concentrates in a channel, check dams slow flow more effectively.
5. Check Dams
Check dams are small barriers placed across swales, ditches, or drainage channels to slow runoff, cut channel velocity, and give suspended sediment a chance to settle before water moves farther downslope.[42][45][46][48] Their main purpose is flow control and scour prevention, with sediment capture as a smaller, secondary function.[43] EPA and state stormwater guidance generally classifies them as erosion-control measures, not a replacement for a sediment basin.[4][48] They make the most sense where swales or ditches start carrying concentrated flow.
Sediment Removal
A check dam works by slowing water down first. Sediment removal comes second, and in most cases that means coarser material, not fine particles. Fine silts and clays often stay suspended and pass through the structure.[4][42][44][48] Some state standards set an 80% TSS removal target for rock check dams, but field data is less clear-cut. One transportation study reported about 70% lower TSS after installation, yet similar drops can also happen in vegetated swales without check dams.[46][40] That’s why their main value is channel protection and flow reduction, not basin-level sediment treatment.
For better performance, check dams should be used with upstream erosion controls such as mulch, seeding, and soil stabilization, plus downstream sediment basins or traps to catch the finer particles that get through.[4][2][48] A sump excavation placed right upstream of each dam can help as well by adding more storage for trapped sediment.[47]
Land Footprint
One of the big pluses of check dams is that they fit inside existing channels and tight corridors without taking up much extra space. Most design standards limit them to drainage areas of 5 acres or less and a maximum dam height of 2 feet.[46] They perform best in straight channel sections. On sharp bends, flow can get pushed into the banks and cause scour around the dam.[44]
When several check dams are installed in a series, the upstream toe of one dam should line up with the crest of the next. The center of each dam should also sit about 6 inches lower than the shoulders.[44][45][46][47]
Maintenance Needs
Check dams need steady upkeep if they’re going to keep doing their job. Inspect them at least once a week on active sites, every two weeks on inactive sites, and within 24 hours after any rain event of 0.5 inches or more.[45] Sediment should be removed once it reaches about one-third to one-half of the dam height or sump depth.[41][44][45][46][47]
Crews should also fix displaced rock, repair undercut channels, and reseed any disturbed banks as soon as problems show up.[44][46][47]
Best Project Phase
Check dams are a good fit for temporary channels and early-stage stabilization work. In that role, they slow runoff, protect newly seeded swales, and limit scour while permanent drainage is still being built.[45][48] In green infrastructure channels, they can also support infiltration and help new vegetation get established.[42][44][48]
Once the channel is stable and the permanent drainage system is in place, temporary check dams are removed. If the site calls for larger drainage coverage or deeper storage, sediment basins and traps are the better choice.
6. Sediment Basins and Traps
When a site is under active grading and sediment loads spike, sediment basins and sediment traps act as temporary holding areas for construction-stage sediment control. A sediment basin is the larger, engineered impoundment placed at the low point of the site. A sediment trap is the smaller, simpler option used for limited drainage areas. In plain terms, they do during construction what permanent green infrastructure is meant to do later.
Sediment Removal
When they’re designed well and kept in working shape, basins often remove 60% to 80% of sediment, and some monitored basins have done even better.[50][53][62][63][64] The outlet setup plays a big part here. Surface withdrawal and media filters can improve TSS removal by drawing cleaner water from near the top of the basin rather than from the murkier lower zone.[56][49][58]
Many state standards set a minimum target of 80% TSS removal, and some places near sensitive waters call for 85% or more along with sizing for a 10-year, 24-hour storm.[54][57] Traps are a different story. Basic sediment traps usually remove about 16% to 30% of TSS, though layered filter fabric can push that number to about 63%.[55] That range matters most on tight sites where space is scarce and maintenance crews are already stretched thin.
Land Footprint
Sediment basins usually take up the largest single BMP footprint on a construction site. A common rule is about 3,600 cubic feet of storage per acre of drainage area. It’s a simple trade: give up land, gain storage, and get a control measure that can handle loads other practices can’t match.[49][53][60]
Basins need to sit at the lowest point of the disturbed area, but still outside receiving waters, wetlands, and required buffer zones. They also need clear access for heavy equipment so crews can remove built-up sediment without turning the whole area into a mess.[49][53] Sediment traps need less room and fit well at concentrated outfalls, roadside ditches, or slope toes serving catchments of a few acres or less. Even so, they still need enough space for safe entry and cleanout.[51][52]
Maintenance Needs
Maintenance is frequent, hands-on, and hard to ignore. Most guidance calls for:
Weekly inspections during active construction
Daily checks during extended rain
An inspection within 24 hours after any storm that drops 0.5 inches or more of rainfall[65][66]
Sediment should be removed once material builds up to half the design storage depth in basins or about one-third of trap capacity.[49][51][52] On busy projects, that can mean hauling equipment back in again and again over the course of a single season.
Best Project Phase
Sediment basins and traps go in early, usually right after perimeter controls are installed, and they stay in service until 80% or more of the drainage area has been stabilized.[50][59][61] After that, basins may be decommissioned or turned into permanent detention ponds or bioretention facilities, depending on the post-construction stormwater plan.[50][53]
Planning for that conversion early can save time and cut down on rework. It also helps connect short-term construction controls with the site’s long-term stormwater layout. Their storage demand, land take, and upkeep set up the contrast for the comparison that follows.
Performance, Space, and Upkeep: A Direct Comparison
These practices fall into two clear groups: permanent green infrastructure and temporary construction controls. They don’t compete so much as they work one after the other. During active construction, the job is to keep sediment from moving off-site. After the site settles down, the focus shifts to treating runoff with planted systems that can handle finer material over time.
That’s why the main question isn’t which option wins on its own. It’s which one fits the site layout, the sediment load, and the stage of the project. This comparison stays focused on three things: sediment performance, space needs, and upkeep.
Sediment Removal and TSS Reduction
Performance changes based on both the practice and the size of the sediment. Temporary construction controls - sediment basins, silt fences, and check dams - do their best work during active grading, where they catch coarser sediment before it travels farther downstream.
Green infrastructure plays a different role. Once the site is stabilized, practices like bioretention and bioswales tend to do a better job with fine suspended solids. In plain terms, they’re better suited for the smaller particles that stay in the water column longer. Vegetated filter strips can help, but on fine-particle removal they tend to lag behind bioretention and bioswales after vegetation is in place.
Land Footprint and Siting Limits
Space can make the choice for you before performance even enters the picture. Silt fences and check dams take the least room. They sit along a perimeter or inside an existing channel, and they don’t need excavation.
Vegetated filter strips and bioswales need a moderate amount of linear or side space, so they work best where the site plan leaves some breathing room.
Sediment basins need the most land of any practice in this group. On many construction sites, they claim the biggest single BMP footprint because design rules call for a large settling area. If land is tight, that can become a major constraint fast.
Inspection and Maintenance Workload
Upkeep is where the split between short-term and long-term controls becomes hard to ignore.
Temporary controls need frequent, storm-driven attention during active construction. A heavy rain can fill, clog, or damage them in a hurry, so inspections and cleanout can’t wait.
Green infrastructure is less urgent day to day, but it still needs steady care over a much longer life. That usually means:
routine inspections
vegetation management
periodic inlet clearing
Temporary controls demand frequent cleanout. Green infrastructure needs ongoing care that is less urgent but more spread out over time. It’s the difference between emergency-style field work and regular landscape maintenance.
Best Use by Project Phase
The table below turns that comparison into a direct side-by-side summary.
Practice | Best Phase | Primary Role | Maintenance Intensity |
|---|---|---|---|
Silt fence | Active grading | Perimeter sediment interception | High (weekly + post-storm) |
Check dam | Active grading | Channel velocity reduction | High (post-storm cleanout) |
Sediment basin/trap | Early construction through stabilization | Bulk sediment settling | Very high (frequent cleanout) |
Vegetated filter strip | Post-stabilization | Sheet flow filtration, TSS reduction | Low to moderate |
Bioswale | Post-stabilization | Conveyance + TSS treatment | Moderate (vegetation + inlet care) |
Rain garden/bioretention | Post-stabilization | Infiltration + fine sediment removal | Moderate (media, plants, outlets) |
The phase sequence is simple: install temporary controls first, then bring in green infrastructure once major earthmoving is finished. That order matters because each practice is built for a different moment in the life of the site.
Pros, Cons, and Best Fit by Practice
No single practice works everywhere. The right pick depends on three plain questions: What phase is the site in? How much room is there? How much sediment is moving? That’s the lens that matters. A control that works well after stabilization can fail fast during active grading, and a practice that looks good on paper may be the wrong call if the site is tight or the sediment load is high.
This section turns the earlier side-by-side review into a short selection guide. It shows where each practice earns its keep, where it runs into trouble, and when it makes sense to put it on site.
The table below is the fastest way to screen the options.
Practice | Pros | Cons | Best Fit Scenario |
|---|---|---|---|
Bioswale / vegetated swale | Conveyance + treatment; integrates into rights-of-way | Needs linear space; clogs under heavy sediment loads | Post-stabilization; roadside and parking lot corridors |
Vegetated filter strip | High sediment trapping in sheet flow; doubles as buffer | Fails when flow concentrates; upslope edge prone to clogging | Post-stabilization; toe of slopes, field edges, parking lot margins |
Rain garden / bioretention | Small footprint; handles fine particles well | Higher capital cost; media clogs under construction loads | Post-construction; infill sites, rooftop and pavement runoff |
Silt fence | Fast perimeter control | High inspection burden; sheet flow only | Active grading; site perimeter control |
Check dam | Reduces channel velocity in small drainage ways | Requires frequent cleanout; not for large areas | Active grading; small temporary channels and swales |
Sediment basin / trap | High capacity; centralized control; simplifies cleanout | Large footprint; cleanout requires heavy equipment and disposal capacity | Early construction through stabilization; large disturbed catchments |
A quick read of the table shows a simple pattern. Vegetated practices tend to do their best after the site has calmed down and sediment loads drop. Temporary sediment controls do the heavy lifting earlier, when soil is exposed and runoff is dirtier. That distinction saves time, money, and a lot of field headaches.
Conclusion
Timing is the whole story here. Temporary controls do the heavy lifting during active construction. Green infrastructure tends to work best after the site is stable. So the comparison is less about picking one “best” option and more about matching the right tool to the right phase, the site footprint, and the upkeep it will need.
The evidence shows that these practices can deliver strong long-term sediment control when they’re designed well and maintained over time. But performance by itself doesn’t settle the choice. Fit depends on available space, maintenance capacity, and whether the job is short-term sediment capture or long-term water quality improvement.
That’s why planning matters early. Set up construction controls before ground is broken, then shield permanent green infrastructure until the drainage area is stabilized. During construction, permanent systems need protection from compaction and sediment loading so their later performance doesn’t take a hit. The aim isn’t to put one category above the other. It’s to use them in the right order.
Strong sediment control programs sequence temporary controls first, then hand off to permanent green infrastructure after stabilization.
FAQs
When should green infrastructure replace temporary sediment controls?
Green infrastructure should not fully replace temporary sediment controls during construction. It works best as part of a hybrid system.
Temporary controls deliver immediate, short-term protection during active construction. Green infrastructure plays a different role: it supports long-term stormwater management, handles frequent small-to-moderate storm events, and eases pressure on conventional systems.
Which option works best for fine versus coarse sediment?
The available research does not clearly separate which green infrastructure tools perform best for fine sediment versus coarse sediment.
What the evidence does show is more general. Bioswales, swales, and constructed wetlands tend to filter pollutants and suspended solids, and constructed wetlands can remove 80–90% of suspended solids.
How much maintenance do these sediment control practices really need?
Green infrastructure practices like bioswales, vegetated strips, and rain gardens are not maintenance-free. They need steady upkeep to keep working as intended. That means managing vegetation, clearing sediment from inlets or forebays, and checking flow-control structures on a regular basis.
This part often gets brushed aside during planning, and that’s a mistake. Maintenance should be treated as a fixed budget item, not an afterthought. In most cases, ongoing maintenance runs about 5–10% of installation cost per year, compared with 1–3% for gray systems.
Related Blog Posts
Latest Articles
©2026
Narrative Change and Power Building: The Missing Half of Advocacy
Narrative change is the process of disrupting dominant narratives that normalize inequity and advancing new narratives from historically marginalized communities.
Funding Resilience Without Federal Grants
BRIC is unreliable and FEMA is shrinking. Here's how cities fund climate resilience with dedicated revenue, blended finance, and a coordinating authority.
The ESG Blind Spot: How AI Is Finding Risks in Companies Nobody Else Is Watching
Norway's sovereign wealth fund uses AI to screen 7,200 portfolio companies for forced labor and corruption within 24 hours. The real story is the emerging-market coverage gap that traditional ESG data vendors miss — and what it means for any company with a global supply chain.
FAQ
What does it really mean to “redefine profit”?
What makes Council Fire different?
Who does Council Fire work with?
What does working with Council Fire actually look like?
How does Council Fire help organizations turn big goals into action?
How does Council Fire define and measure success?
How does technology fit into Council Fire’s work?